
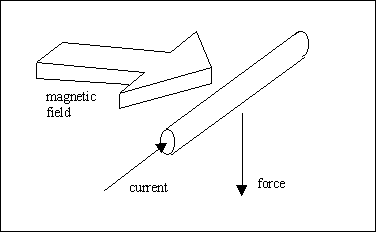
The basic law of a motor, the reason why they rotate, is governed by Fleming’s left hand rule (see figure below). This tells you the direction of the force on a wire that is carrying current when it is in a magnetic field.

The next diagram shows the force acting on a wire carrying current, obeying the left hand rule:
If we now bend the wire round in a loop, and place it in a magnetic field caused by two permanent magnets, we have the situation shown in the diagram below. Here, both sides of the wire loop will have a force on them, trying to make the wire loop rotate. The current is applied to the loop through the commutator, which is shown as two pieces of metal formed into a ring in the figure. Current is applied to the commutator by stationary graphite blocks, called brushes, which rub against the commutator ring.

The loop will continue to rotate anticlockwise (as we see it in the figure) until it is vertical. At this point, the stationary brushes won't be applying current around the loop any more because they will be contacting the gap between the commutator segments, but the inertia of the loop keeps it going a little more, until the DC supply reconnects to the commutator segments, and the current then goes around the loop in the opposite direction. The force though is still in the same direction, and the loop continues to rotate.
This is how DC motors work. In a real motor, there are many wire loops (windings) all at varying angles around a solid iron core. Each loop has its own pair of commutator segments.This block of core and wire loops is called the rotor because it rotates, or the armature.
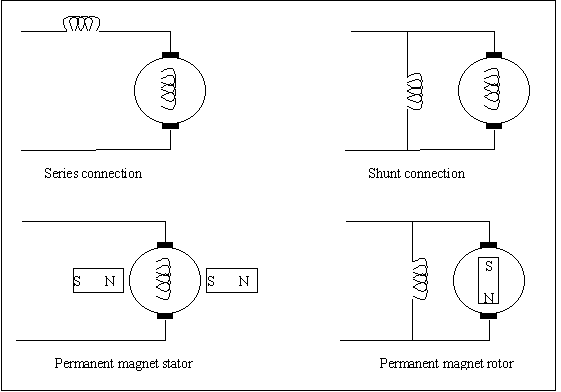
The fixed magnets in the diagram above generating the field may be replaced by electromagnets which are generally more powerful. The elctromagnets are supplied by the same power supply as the armature winding, either in series (series connected) or in parallel (shunt connected) as shown in the diagram below.
If permanent magnets are used, the motor is said to be a permanent magnet (PM) motor. DC motors can also have permanent magnets in the armature, and electromagnets for the stator coils. In this case, the stator windings must be switched in some way to make the permanent magnets in the rotor follow them to cause rotation. This connection is less common for small motors.
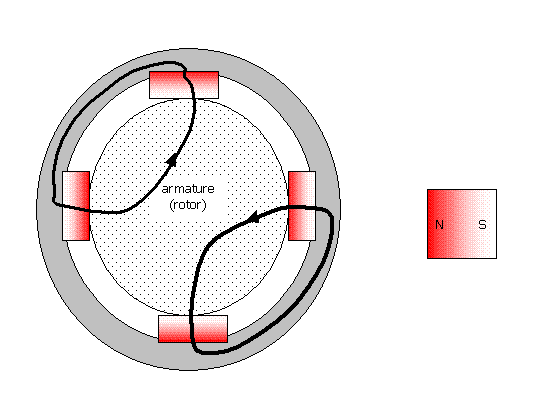
There may be more than just the two fixed magnets, called poles. In some motors there may be four poles (imagine one more coming from above and one more from below in the figure). There will always be an even number of poles, since there is an N pole for every S pole, and in the equations governing the motor, the number of poles is often quoted as p, the number of pole pairs. These magnets are called the stator because they are stationary, and the electromagnet coils are called the field windings because they generate the magnetic field.
The supply is connected to the commutator segments through graphite brushes. These are held in little sockets with a spring behind them, so the brush is pushed onto the segments. This guarantees a good electrical connection (although there will be a fraction of an Ohm resistance across them). Eventually, these brushes wear down completely. If you get the motors from a scrap yard, the brushes may need replacing. New brushes should be available from automotive spares shops.
A four pole motor is shown in the diagram below. This shows how the magnetic field is generated by the poles and flows through the rotor:
If you can imagine getting the cylindrical rotor of a starter motor, and unrolling it, the wires would look something like this:

In this diagram, the stator magnetic poles are shown underneath the rotor wires. You can trace the electrical current from the supply, through a commutator segment, through all the rotor wire loops, and back through a commutator segment. For a four pole motor (two pairs of poles), two pairs of commutator segments will be supplying current to the rotor wire loops
We can now draw a circuit diagram of the motor. The coils of wire will have a small resistance, and a quite large inductance. Rb represents the resistance through the brushes to the commutator. Rf is the resistance of the field windings, and Ra is the resistance of the armature (rotor) windings.
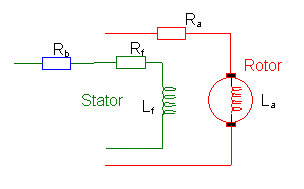
If the motor is has permanent magnets for the field, then of course Rb and Rf don't exist. Most starter motors use a serial connection. (For example values of these resistances and inductance, the starter motors I am using (from a Ford Fiesta) have an inductance, La, of 71μH, and resistances of Rb=0.008 Ohms, Rf=0.016 Ohms, and Ra=0.017 Ohms, giving a total, Rt, of 0.041 Ohms.
The resistance of the coils of wire that make up the field and armature are normally very low. So you would think that the motor would take a very large current (current = voltage ÷ resistance). However this back emf means that there is actually only a small voltage across the resistance of the coils, because the back emf, ea, is nearly as large as the supply voltage, Vt. Therefore , the actual current taken is

Some typical values for a 900Watt starter motor are: Rt = 0.041 Ohms, Vt = 12V, ea = 11.9v, so the motor current is 2.4 Amps.
The back emf is dependant on the speed of the motor, and is given by the equation
where k is a constant for the motor,Ω m is the speed of the motor, and Φ is the strength of the magnetic field generated by the field coils or magnets. From this equation you can see that when the motor starts, and its speed is zero, then the back emf will be zero, and so the current taken by the motor will be very large. This is also true when the motor is stalled.
When a load is put on the motor, the speed drops, and so the back emf
drops, and so the current drawn from the battery will increase.
The torque produced by a series motor is given by the equation
where kf is a constant for the motor, and ia is the current, and Φ is the field strength. A series wound motor generates its field from the same armature current, so Φ increases as the motor draws current. Therefore the torque is proportional to the square of the current. This means that doubling the current that we put through a series wound motor quadruples the torque. This is a distinct advantage of series wound motors.
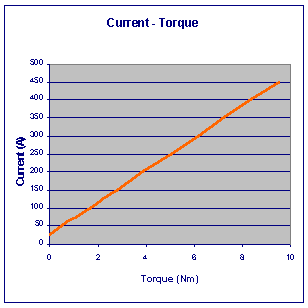
For a permanent magnet or shunt wound DC motor, the current drawn by
the motor increases linearly with load torque: Notice that the line does not intersect the (0Nm / 0A) origin point.
The zero torque point intersects at 25 Amps for this motor (an Iskra 900W
starter motor). This means that the motor will not even start to turn until
it is pulling 25 Amps!
The values Ra and kf are constant for any particular
motor. It can be seen that the speed will drop off as the load torque
increases,
but differently for each type of motor:
From this graph, and the equation, it can be seen that the speed of
a series motor with no load torque will rise to infinity! This doesn't
happen in practice because there is always a little load torque because
due to friction in the motor. It can also be seen that as a little load
torque is added to a series wound motor, the speed drops off very quickly
to start with, but then drops off less quickly.
With both motor field types, eventually, when the load torque becomes
even larger, say when a stronger robot is pushing us backwards, the motor
speed becomes negative (the motor starts rotating backwards).
In practice, the speed line for a PM or shunt wound motor may not be
a straight due to frictional loads which are not linearly dependant on
speed.
The torque speed graph of a DC motor when it is being driven by a
speed controller with current limiting can be found in the speed controllers section.
The power the motor is putting into the load is
When the motor is running with no extra load other than its friction,
then the load torque is zero, and so the output power is zero. The input
power is small also because the back emf is almost equal to the supply
voltage. The only power drawn from the battery is driving the loss torque:
When the motor is driving such a large torque that it has stalled, then
the back emf is zero, and the input power is very large:
and the output power is zero because the speed is zero.
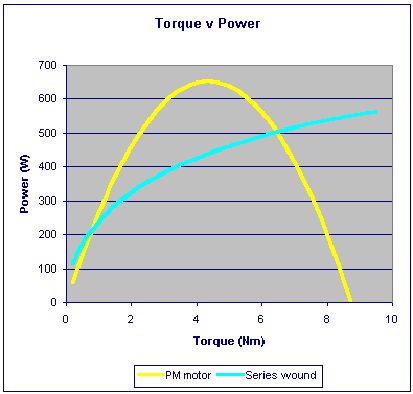
At some point in between, the output power is at a maximum. If we plot
the product of the torque and speed, we will have the graph for power:
The power versus torque graph is a quadratic curve, with a maximum which
the manufacturer specifies as the power rating of the motor. For a starter
motor on a small car, this is typically around a kilowatt.
The efficiency of the motor is defined as the amount of mechanical power
you are getting out of the motor divided by the amount of electrical input
power you are putting in, so:
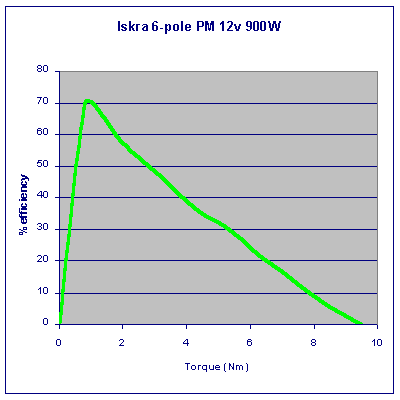
The efficiency can also be plotted against load torque. Here is the
efficiency graph for an Iskra shunt wound starter motor:
Just because the maximum efficiency is at around 1Nm doesn't mean that
you have to run the motor at that torque though!
There is a section about the power rating of DC motors in the spinning
disks chapter
here.
Iskra 12 Volt 900 Watt shunt wound starter motor
The Bosch GPA750 has the following nameplate values:
Graphs for other motors, and sometimes the same motors at different voltages
can be found at the following sites:
Lynch (LEMCO) motors
To fully test the motor, you will need the following equipment:
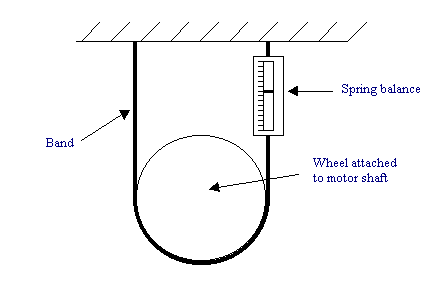
Fit the motor into the apparatus as shown. There must be a means of
adjusting the height of the motor so that band can be tightened. Start
it off with the band stretched slightly tightened (but not too tight).
Run the motor, and record the speed it is going at (call this w1).
The spring balance should change reading a little (if it doesn’t then the
band is not tight enough, so move the motor and wheel downwards a little),
record the spring balance reading (call this F1).
Now move the motor and wheel further down (tightening the band further)
and repeat. make sure that the speed and spring balance reading have changed
appreciably - enough to see the difference, but not so much that it stalls
the motor. Record the speed (w2) and spring balance readings
(F2) again.
The spring balance reading must be converted to Newtons before we can
use it. The speed must be converted to radians per second also. The following
table will help you do these conversions.
The load torque on the motor in the tests is F × r where
F
is the force in Newtons read by the spring balance, and r is the
radius of the wheel (in metres).
By gradually tightening the band, the shape of the torque-speed graph
can be established. For a PM or shunt motor, we already know the graph
is almost a straight line, so if we knew the stall torque, and the no-load
speed, we can just draw a straight line between them. For series motors,
the band must be tightened gradually to obtain several readings so the
curve can be plotted.
This apparatus is useful if you need to match more than one motor for
your robot. If you have two motors and are running them with open-loop
speed control, then if they are not sufficiently matched for torque-speed
characteristics, then your robot will tend to swerve when you are trying
to drive it in a straight line.
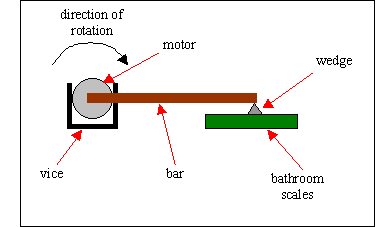
Now power up the motor so it will be forcing the bar downwards onto
the scales (make sure you have the direction correct and it won't flip
upwards!), and read the scales. Do not keep the motor powered up for long
as it will be taking a very large current.
The stall torque can now be calculated:
Tstall = 9.81 x W x L
where W is the weight in kg and L is the length of the bar.
no load speed (rads/sec) ÷ gear reducing ratio × wheel
radius - speed loss due to friction If the no load speed is 200 rads/sec, say, and the speed loss due to
friction is 2 metres per second, then the road speed will be 200 ÷
4 × 0.15 - 2 = 5.5 metres per second, which is about 12 miles per
hour.
To measure the speed of the motor, you will need a
tachograph
or Stroboscope
.
Projects to build both of these are given in the circuits section of this
web site. Click on the names above to go to them.
Rtotal = 0.041Ohms
Ltotal = 200μH You can build your own low resistance meter. Some circuits are
presented
here.
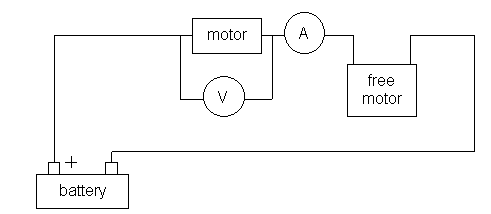
This requires two motors. One is the motor under test with its rotor
fixed, and one is allowed to run freely. To pass current through the motor
under test, simply apply a load to the free running motor (trying to slow
it down). As its load increaes, it will take more current, and the voltage
drop across our motor under test will increaese. You want as large a current
as you can measure with your ammeter, so that the voltage is large enough
to measure.
Maplin sell one for £100 (part number LD17T), which also includes
all the normal ranges of a DMM. If you do not already have a DMM, it may
be worth investing in this one. It also has a frequency measurement range
up to 20kHz which would be useful when measuring motor rpm. Note that the
other similar cheaper meters to this one in Maplins range do not measure
DC current, only AC and so are not suitable.
If you already have a DMM, you can buy a clamp attachment which just
plugs into your DMM. These can be quite expensive (well over £100 just for
the probe, but CPC supply one
(order code IN00710) made by Tenma
(model number 72-6174) for £30.
It's impossible to say how much current they will take on average, because
it depends completely on what the motor is doing at the time.
An ideal electric motor (this doesn't exist of course but it is what motor
manufacturers aim for), will convert 100% of the input electrical power into
output mechanical power. This means that if the motor is not required to
deliver any mechanical power - for example the vehicle is rolling at constant
speed and there's no friction (I did say it's the ideal case!) - then it will
draw no electrical power.
The mechanical power output is the load torque, 'T' (how much the
vehicle is resisting the motor going round) multiplied by the rotational speed
of the motor, 'ω'. The electrical input power is the
voltage across the motor, 'V', multiplied by the current drawn by the
motor, 'I'. In this ideal situation, the mechanical power equals the
electrical power:
Pm = Pe
so
Tω = VI
Therefore, if the load torque is zero, Pm is zero. The voltage will still be
across the motor, so I will be zero - the motor takes no current.
Of course the world is not ideal - there will always be friction in real
life - the wheel bearings, any gearing you have, the wheels against the floor,
the bearings in the motor itself etc, and so T will never be zero. It follows
therefore that 'I' will never be zero either. There will always be a little bit
of current required to drive the vehicle even on a flat surface. For starter
motors, this can be reasonably large. The problem with starter motors is that
they are designed to do a quick dirty job for a few seconds. Their main design
consideration is cost - they must be cheap for the car manufacturers. Most do
not have proper roller bearings, but use a phosphor bronze sleeve bearing. The
shaft of the motor simply rubs against the very hard bronze. This obviously
causes a lot more friction that a roller bearing, but the car manuafacturers
don't really care about that - it doesn't matter much for them. I have heard
that it can take up to 20 Amps just to overcome this friction, although I have
not experienced that myself. One alternative which is quite easy and
inexpensive if you have welding equipment is to remove the bronze sleeves, and
replace them with roller bearings. A roller bearing shouldn't cost any more
than £2 (US$3). This should reduce the frictional current to a couple of amps
at most.
As for the maximum current that the motor can take, this is governed by the
resistance of its coils and brushes inside. Going back to an ideal motor, this
would have zero resistance. When this ideal motor is stalled, it will take an
infinite current, which will produce an infinite torque, and push whatever
blockage is out of the way. In a real motor, the torque it can produce is not
infinite, it is limited by the maximum current that can flow through the motor.
The maximum current is simply the voltage applied to it divided by the motor's
internal resistance... Imax = V / R. This is often called the stall current
because it is the current the motor will take when it is not rotating, but full
voltage is applied (i.e. it is stalled). A typical small car starter motor may
have an internal resistance of 0.04 Ohms, so at 12V the stall current will be
12 / 0.04 = 300 Amps. Using our old equation Tw = VI, this maximum current
corresponds to a maximum torque, which is often called the stall torque, and is
how hard the motor will twist if you hold the shaft stationary. The motor is
not rated to take this current for any length of time. Typically it will be
rated for continuous use at about a quarter of this stall current.
In between these two currents, the motor may take any current, which will
depend on the mechanical load. When accelerating the vehicle or pushing against
an opposing force, it will take more, when decelerating or going downhill, it
may take zero current.
Controlling voltage spikes (motor suppression). SGS Thomson Acrobat
document.
Using car windscreen wiper motors
2.4. Speed
For all DC motors, the speed is nearly proportional to the supply voltage,
except for the effect of the armature resistance:


2.5. Power and efficiency
The power a motor is taking from the battery is
![]()
2.6. Characteristic graphs for some motors
Most of the graphs presented above were based on example values. Let's
look at the characteristic graphs for some real motors:
Bosch GPA750
Lynch 12V
Lynch 24V
Scott 4BB-02488 motor (datasheet)
Scott 4BD-1460 motor datasheet.
Parameter Value Nominal voltage 24 V Nominal power 750 W Nominal current 40 A Nominal speed 3300 rpm Continuous torque 2.2Nm Stall torque 11 Nm
Iskra motors
Scott motors
Bosch motors
3. Testing
When designing your robot, it is very useful to know how fast the motors
will be going under various load conditions. Basically, this means knowing
the exact shape of the speed-torque graph described in section 2.4. This
will tell us how fast the motors will go on no-load, and how much torque
they will develop when they are starting or stalled. With the gearing
information
and wheel sizes, this will tell us how much force your robot will be able
to push, and give us an idea of the maximum speed of the robot.
The speed measuring device must be able to tell you the RPM of the motor.
This may be the hardest piece of equipment to get hold of. Stroboscopes
used for adjusting the timing of car engines are generally not of any use,
since they require a reference pulse from the spark plugs. Here are some
methods that you could use to perform this:
Spring balances are available from general hardware stores, and angling
shops. They are normally used for weighing. The load band is a tough piece
of material that wraps around the wheel (which must be attached to the
motor), that won’t disintigrate too quickly. A piece of old seat belt from
a car in the scrap yard is ideal. Here is the test setup:
3.1. Stall torque
The band appartus described above may not be suitable for measuring the
stall torque, since this can be quite large. An alternative is to fix (weld
/ bolt or whatever) a bar to the end of the motor shaft, perpendicular
to the shaft. Mount the motor in a vice horizontally. The bar should preferably
be at least half a meter long. Rotate the bar so it is horizontal, and
place bathroom scales underneath the end of it. You may have to place a
wedge between the bar and the scales so you you know the exact length of
the bar between the motor shaft and the scales.
3.2. Maximum speed
We can get some idea of the maximum speed of the robot now. Since we don’t
know how much friction there will be in the gearing, and in the robots
transmission from wheels to ground, we'll have to guess that! If, for example,
the gearing is set to reduce the speed by a ratio 4:1, and the wheels are
30cm in diameter, then the road speed of the robot will be:
3.3. Motor resistance
The motor resistance tells us how much current the motor will take when
it is stalled or when it is just starting up. For PM and shunt motors,
this is the sum of the brush resistance and the armature resistance. For
series motors, this will also include the series field resistance. The
resistance is normally very small (generally less than 0.1 Ohms), and so
cannot be measured with a simple digital or analogue multimeter. There
are several ways that it can be done.
3.3.1. Low resistance meter
This is a measuring instrument specially designed for measuring very low
resistances. It may also be an LCR bridge which can measure the inductance
also. Fix the rotor tight so it cannot rotate (so no back emf is induced),
then use the instrument to measure the terminal resistance. I used one
of these to get the following results for a Ford Fiesta starter motor:
3.3.2. Use another load in series
This is probably the easiest way if you can’t do (1). There are several
easy methods. What we are trying to do is pass an appreciable current through
the motor so we can measure the voltage dropped across it. The rotor of
the motor under test must be fixed.
3.3.3. Use a clamp meter.
These are meters that can be clamped onto or around wire, and measure the
current flowing in the wire by the magnetic effect. AC current is measured
using a single coil in the meter as the secondary of a current transformer.
To measure DC current, the meter measures the voltage of a Hall effect
device in the meters clamp.
4. How much current will my motor take?
I'm often asked this question, so here's a whole section just to answer
it!
5. Links
Theory of starter motors. Quite a good page.
http://www.apra.org/publications/electrical/fordther.htm
http://us.st.com/stonline/books/pdf/docs/1703.pdf
http://www.geocities.com/sprite-midget/wipers.htm