Using microcontrollers in your robot

V3.02 05-Mar-2004

1. Why use embedded microcontrollers in a robot?

Many of the robots in Robot Wars do not have a microcontroller on board. A simple robot can be built like this, but the addition of an on-board microcontroller provides valuable extra functionality and ease of driving.

1.1 Better steering

Most robots use very simple steering mecahnisms, often tank-style steering, and will often swerve rather than go in straight lines. If you want better, and easier controlled steering then the best solution is to use a microcontroller. The micro can measure the appropriate wheel speeds, and set the PWM ratio for the speed controller appropriately.

1.2 More drive motors

With an on-board microcontroller, it is easier to make your robot have active drive on more than just two wheels. This certainly improves the situation when you are shoving, or have wheels lifted off the ground.

1.3 More weapons

A standard robot needs multiple channels on the radio handset – one for speed, one for steering, and one for weapons at the very minimum. If you have an on-board microcontroller you can send data through a single channel of the radio link, and have as many weapons, actuators, or lights as you want.

1.4 Artificial intelligence

When you are being attacked by a swarm of house robots, you may want to make a quick getaway. This may involve retracting weapons, unpowering weapons and other systems to allow more power to the motors, and sprinting! Or you may have a complicated manouver that requires quite a bit of skill to perform – let the microcontoller do it perfectly every time!
 

2. What controllers to use.

2.1 Laptop PCs

I have seen mention of fitting a laptop inside a robot. This is a frightening thought. Do not do it! They are not built for ruggedness, and will not survive 5 seconds inside a robot before a hard disc head crash finishes it off! And if you were thinking of using Visual Basic under Windows.....no comment!

2.2 Dedicated embedded controller modules

Dedicated embedded controller modulesIf you are not comfortable designing and building electronics , then it may be best to go for an off-the-shelf microcontroller module. These range from the great Basic Stamp which has an Arizona Microchip PIC processor and can be programmed in BASIC, right up to PC104 single board PCs, which can be programmed just like a normal PC. Don’t use windows though, it’s too slow and unreliable.

The table below summarises just a sample of what’s available.
 

Manufacturer
Product
Pro-gramming language
Comments
Price
Hardware
Serial
ports
PWM
I/O
Ain
Aout
MicroRobotics Scorpion K4S Proprietory May not be fast enough since it runs an interpreted language. Single £102
Dev kit £300
 
2
16 

to 

128

to 

32

to 

8

MCU Research Proto-1 and Module-1 C Good value and well equipped. 64k ROM, 4k RAM + SPI port, EEPROM, and watchdog US$130 and US$70
2
3
31
8
0
Ajile Systems aJ-PC104 Java Probably very expensive. Java is the "in thing" but not necessarily the "best thing"!  
?
2
8
0
0
JK Micro PC compatible single board computer Any PC compiler Easy to develop on home PC. Cheap. Questionable ruggedness US$69
2
0
44
0
0
Many PC-104 solutions Your choice Easy to develop on home PC. Questionable ruggedness Various 

Some are cheap.

>=1
0
Various
 
 
Many PIC solutions BASIC / C / Assembler The ubiquitous BASIC stamp may be too slow. You can get a C compiler for the PIC as well though, and use a prototyping board Various
>=1


DonTronics Atmel AVR and PIC based kits BASIC / C Australian hobbyist source of cheap dev kits for AVR and PIC. from Aus$65
1
0
12
2
0
Rabbit Semiconductor A clone Z80 microcontroller C Cheap development kit and online resources from US$139


Lineo A 16MHz 68k-based Linux ethernet server with I/O on a 30pin SIMM! C Cheap development kit and online resources US$250
 
1
18


There are other links to sources at http://www.compapp.dcu.ie/~cdaly/embed/embedsys.html.


2.3 Build your own

Building your own allows you to choose the best microcontroller for your application, and design in as many features as you need. I have chosen the Hitachi H8S 3148 for my robot, which has 16 PWM channels, 30-odd I/O lines, and 8 analogue inputs.

This requires some expertise in designing the hardware, etching the PCB, writing the software, and debugging the whole lot. You should also think about incorporating a boot-download facility, whereby you can download new software from a PC serial port any time you want. My robot has a 9-pin D-type connect under a flap for this purpose.

Information on processors in generally available on the manufacturer’s web-sites – look in http://www.chipdir.com/chipdir/f/mcu.htm for a huge list of manufacturers. The chipdir site is full of excellent stuff so have a good browse around.


3. Embedded programming

3.1. The difference from computer programming

Embedded programming is a little different from programming a PC. You have to think at a lower level. You do not have an operating system (unless you buy one in but that will be expensive). The I/O lines must be programmed by single instructions. The serial port will need functions for reading and writing blocks of data. There are no BIOS calls! Many manufacturers have sample code on their web-sites for programming the on-chip peripherals such as UARTs and timers, so get hold of these if you can.

There are several links to embedded programming articles at
http://www.compapp.dcu.ie/~cdaly/embed/embedsys.html.

Generally you will have a development system running on a PC. The decent ones cost thousands of pounds so you will probably be using a GNU based one. I have heard the Hitachi H8 compiler by GNU is OK.


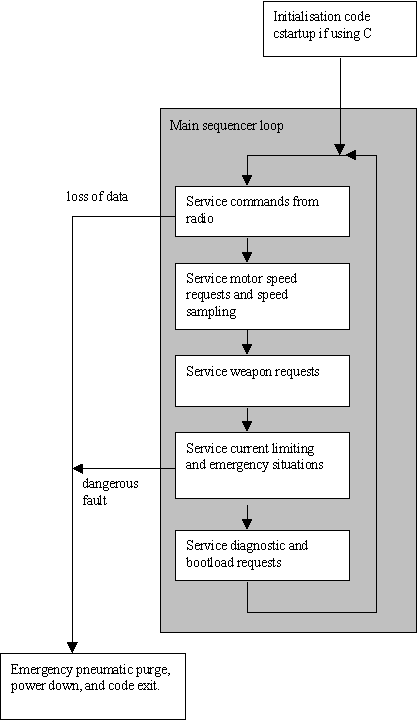
3.2 Software structure

If you are not using a real time operating system (RTOS), and you’re not writing your own pre-emptive multitasking kernal (!), then you will probably have a top-level sequencer loop. A block diagram of an example robot on-board embedded program is shown below:


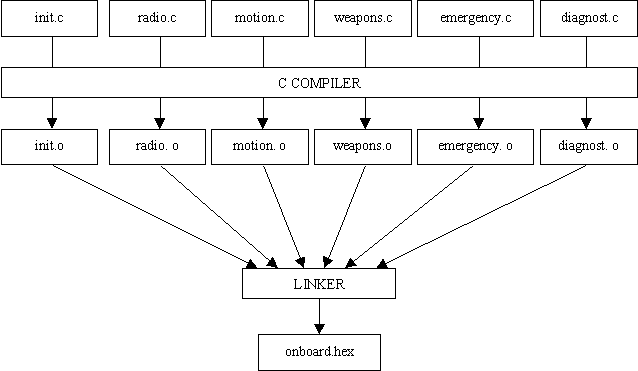
3.3 Software development

To make code development and maintenance easier, each of the boxed sections in the block diagram above should be a separate file. These are then compiled or assembled to form object files. The object files are then linked to form a complete program which can be downloaded to the robot. Using the same example as above, and assuming it is written in C, below is a diagram of this process.

The final program, onboard.hex, is in Intel Hex format in this example. This is just a format for binary files, much the same as a .exe file is on a PC. The bootloader in the program should be able to accept this file through one of the microcontroller’s serial ports, and load it into the program memory, which may be RAM, or preferable FLASH.

There are many different binary file formats, but the two most common in embedded work are Intel Hex and Motorola S-Records. Larger 32-bit processors may use ELF, or COFF formats. Many binary file formats are discussed at http://www.wotsit.org/search.asp?s=binary.


3.4 Sequencers and operating systems

At the very top of the program, controlling which module gets called when, there is a controlling module. This may be as simple as a loop which calls each module in turn, up to the most complex operating systems such as Windows NT or Linux! Let's describe these in turn starting from the simplest. All examples will be in C:

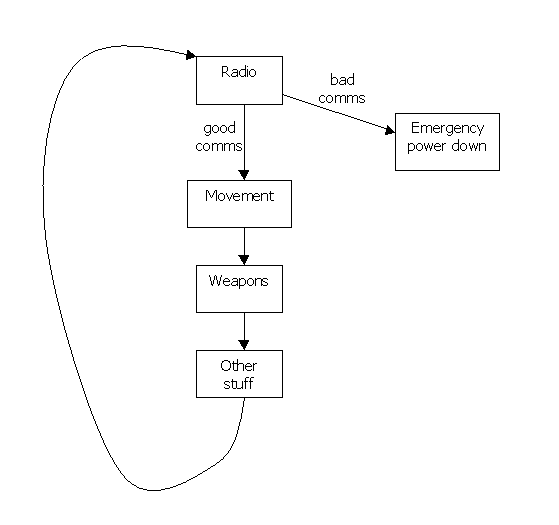
3.4.1 Very simple main control loop

This might look like the following:


void main(void)
{
    int RxError;

    while (RxError == FALSE)
    {
        RxError = GetRadioCommands();
        ControlMovement();
        ControlWeapons();
        DoOtherStuff();
    }

    EmergencyPowerDown();
}

The three modules are called as fast as the processor can spin round the while loop. The three modules just get the current radio command. If the radio is just PWM from a normal RC receiver, this module will decode the PWM signal which then maybe will set global variables for the steering, movement, and weapons requests.
Notice the RxError variable which is set by the GetRadioCommands() function. If there is a problem with the radio data, this allows the variable to be set to FALSE which will cause an emergency shutdown in the PowerDown() function.

3.4.2 Timed control loop

It may not be desirable to call these functions so quickly. The movement may be written so that it should be called at a regular interval for example. As it stands, the control may be very erratic because the ControlMovement() function is called at irregular intervals determined by the operation time of the other functions, which will be varying depending on what they are currently doing.

The way to combat this is to use a timer in the controller (whether it be a microcontroller or a single board computer) to generate a timer-interrupt:


void main(void)
{
    /* Setup the timer interrupt */
    SetupTimerInterrupt();
    GoToSleep();
}

void interrupt [T1] TimerInterruptServiceRoutine()
{
    int RxError;

      RxError = GetRadioCommands();

      if (RxError == TRUE)
      {
        EmergencyPowerDown();
      }
      else
      {
        ControlMovement();
        ControlWeapons();
        DoOtherStuff();
      }
    GoToSleep();
}

In this example, the main function just sets up the timer interrupt and sends the processor to sleep. Most embedded controllers will have a low-power sleep mode where it just idles using very little power until an interrupt occurs. When the interrupt is detected, the interrupt service routine (ISR) is called. This function declaration uses a format used by IAR embedded compilers. The 'interrupt' word tells the compiler this is an ISR, and the word in square brackets tells it which interrupt vector this function is for. I've just called it T1 to mean 'Timer 1', but it will be different depending on what processor is being used.

Let's go through the operation. First, in main(), the timer is set up to interrupt every 'n' milliseconds. Then the processor goes to sleep. After 'n' milliseconds the interrupt will arrive and the TimerInterruptServiceRoutine() ISR will be called. This gets the radio command, and performs the movement and weapons as reuqested, then goes back to sleep again. The process is repeated each time the interrupt arrives.

What happens in the code in TimerInterruptServiceRoutine() takes longer than 'n' milliseconds? Generally, a disaster! Most processors will not respond to another interrupt if they are already in that interrupts ISR. This means that the interrupt will be ignored. This may not be a problem if your code can cope with that, but generally it is better to make sure that the ISR will always complete before the interrupt next arrives.

3.4.3 State machines

If this cannot be guaranteed, we can use a state machine to control what gets run each time the interrupt is called. For example, we can do the motion control one visit, then the weapons the next, then the motion control again, etc. However many modules need calling, a state machine can control the order and frequency in which they are called. Let's add a state machine. The main() function remains the same so is not shown:


/* These are the possible states */
enum {RADIO, MOVEMENT, WEAPONS, OTHER_STUFF};

int StateVariable = RADIO;

void interrupt [T1] TimerInterruptServiceRoutine()
{
    int RxError;

    switch (StateVariable)
    {
        case RADIO:
            RxError = GetRadioCommands();
            if (RxError == TRUE)
                StateVariable = EMERGENCY_POWER_DOWN;
            else
                StateVariable = MOVEMENT;
            break;

        case MOVEMENT:
            ControlMovement();
            StateVariable = WEAPONS;
            break;

        case WEAPONS:
            ControlWeapons();
            StateVariable = OTHER_STUFF;
            break;

        case OTHER_STUFF:
            DoOtherStuff();
            StateVariable = RADIO;
            break;

        case EMERGENCY_POWER_DOWN:
            EmergencyPowerDown();
            break;

        default:
            StateVariable = RADIO;
            break;
    }
    GoToSleep();
}

In this example, only one function is run for each interrupt. Which function is run depends on the state variable. That function then decides what the next function to be run will be. We can draw a simple state machine to describe the behaviour of this code:

In this manner, very complex state machines can be created. Each function (movement, weapons, etc) can also have state machines inside them. For an example of this, see the demo code later in this chapter.

If the state variable is every anything but one of the states, the 'default' command will set it back to into the state machine. This is important in safe programming to control crashes. If the RAM holding the variable got a glitch and got set to 255, then this default action will restore the state machine to proper functionality within one interrupt.

3.4.4 Counter controlled sequencers

You may want the functions to be called at certain intervals and at certain times with respect to each other. One way to perform this is using a counter sequencer:


void interrupt [T1] TimerInterruptServiceRoutine()
{
    static int Counter = 0;

    switch (Counter)
    {
        case 0:
            RxError = GetRadioCommands();
            if (RxError == TRUE)
                EmergencyPowerDown();
            break;

        case 1:                     break;
        case 2: ControlMovement();  break;
        case 3: ControlWeapons();   break;
        case 4:                     break;
        case 5: ControlMovement();  break;
        case 6:                     break;
        case 7:                     break;
        case 8: ControlMovement();  break;
        case 9: ControlWeapons();   break;
        case 10: DoOtherStuff();    break;
        default: Counter = 0;       break;
    }
    Counter++;
    GoToSleep();
}

In this example, the action repeats every 12 interrupts. In that time, the movement action is performed four times (every 3 interrupts), the radio is read once, and the weapons controlled twice. This allows us to set the priorities, and the order in which the actions occur. When the counter reaches 11, the sequence restarts. If the counter gets corrupted, the sequence will also restart.

3.4.5 Real Time Operating Systems (RTOS)

The next most complicated step is to use a RTOS. These are available commercially and there are also a few public domain ones. What do these do, and why do I want one?

The main function of the RTOS is to control what modules get called when. In RTOS terminology, the modules are called processes. This is the same as what the sequencers above were doing, but RTOSs allow a lot more flexibility. Common features of them include:

  • Pre-emptive multitasking. This means that a process may be running along happily, but when a more important process wants to run, it stops the first process and takes over until it has finished, whereupon the first process starts where it left off again.
  • Process priority setting. Each process can be assigned a priority, often from 0 to 255. If a lower priority process is running when a higher one wants to start, the low priority process is suspended until the higher one has finished (or until the higher one suspends waiting for something else - see below).
  • Inter process messaging. Each process can send and receive user-defined messages between each other. These may be in the form of queues, pipelines, or FIFO stacks. If a process is expecting a message but the message has not arrived yet, it can suspend on that message, This means it will stop running (thereby allowing other lower priority processes to run) until the message arrives. Processes can also suspend waiting to send a message to a process which has a full mailbox
  • Full timing control. Each process can be set to run at regular intervals using timers. They can also use timers just to read, or to suspend on until the timer reaches some value. Any number of timers can be used because these are under software control of the RTOS, which uses the hardware timers to control them.
  • Interrupt control. The RTOS will generally take care of the hardware interrupt actions, making use of these rather easier.
  • Peripheral drivers. Some RTOSs include drivers for disc drives, FLASH memory, IIC devices, TCP/IP stacks, etc.

Some RTOSs have more features (and are more expensive!) than others, so the choice is yours. At least two are entirely free as long as you don't use them for commercial products. The table below shows a few and where to get them:

Writer

RTOS

Comment / Processor platforms

Free?

Wind River Systems

VX Works

One of the industry standards. Many platforms.

No

Accelerated technology

Nucleus

One of the industry standards. Many platforms.

No

QNX

QNX

Based on UNIX many years ago. Has developed into a separate product now. PC platform.

Yes

Jean Labrosse /

Micrium

MicroC/OS-II

Comes with the book MicroC/OS-II RTOS (see link in books section below). Many platforms.

Yes

RTEMS

RTEMS

Open source RTOS

Yes


AvrX

An RTOS for the Atmel AVR family.

Yes

Seoul National University

ARX

PC platform

Yes

Red Hat

eCOS

x86, PowerPC, & Intel StrongARM platforms

Yes

University of Pennsylvania

EROS

x86 platforms.

Yes

There may be more listed on this site.

3.4.6 Computer operating systems

A while back, Microsoft decided to try to enter the RTOS market by stripping down Windows NT. They boldy claimed that the Embedded Windows NT would run in only 8 Mb of RAM. Most proper RTOSs will run in about 4kbytes! Unfortunately for them, it wasn't exactly real-time either. An RTOS must strictly obey the timing constraints set by the program, and must never miss an interrupt. It is important that the time betweem an event and the response must have a definite maximum. All proper RTOSs do this.

What about Linux? Again, this is not an RTOS. However, RTOS versions of it have been written, and of course they are all free under the Linux license. An article all about them appeared in Linux User issue 9, and is available in PDF format here

3.5 What can I do in software?

This is almost only limited by your imagination, and ability to design the electronics and mechanics that the microcontroller is going to drive. These are the jobs performed by the microcontroller in my robot:
  • Initialisation of radio chip – channel and gain selection.
  • Reception and decoding of serial data stream from radio chip.
  • Monitoring of wheel speeds.
  • Setting of wheel speeds, including motor PWM levels and current limiting.
  • Determination of which way up robot is, and consequent swapping of motor directions.
  • Dual hammer weapon control, including firing and docking.
  • Rail-gun spear control, including spear position detection and coil sequencing.
  • Pneumatic valve control for flipper.
  • Pneumatic reservoir charging with compressors, including pressure sensing.
  • Control and pattern driving of 99 (3-phases of 33) LEDs around robot periphery.
  • Emergency shutdown (failsafe) based on radio code error detection, watchdog, and fault conditions.
  • Emergency escape – retract all weapons, turn off compressors, turn off current limiting, switch ot open loop speed control of wheels, and send all power to the wheels.
  • Tricks involving flipping over, spinning, weapon brandishing etc.

3.6 Radio messaging

Virtually all microcontrollers have a UART built in, and this will generally be used to receive data signals from the radio receiver. A protocol must be designed so that switches and dials set on the handset can be decoded to drive the appropriate motors and actuators in the robot. The data stream must have enough error checking that a little noise spike does not cause the robot to run over people’s feet or chop their hands off! The handset must also have a microcontroller in that detects the switches and positions of joysticks and dials, and generates the message to be sent. The transmit line of the UART in the handset microcontroller drives the radio transmitter input signal.

If you have a 2-channel radio set and use a microcontroller with twu UARTs, you can send the same data through both channels. Then at the receiver, direct each channel to each of the UARTs. If one channel is suffering from too much noise, the data from the second channel can be used. This sort of redundancy can increase the reliability of the robot a great deal.

As an example of a radio message, or packet, that can be used, here is the format of the data stream that I use in my robot. Commands come in a continuous stream of packets from the handset. Each packet is a fixed length and is of the following format:

Size in bytes
2
1
1
2
2
2
Field
START
SPEED
DIREC
WEAPON
SPECIAL
CRC

START (16 bits)

This is a constant 2 byte message 0xA55A. This two-byte sequence cannot occur elsewhere in the datastream, so if the robot starts looking for data half way through a sequence, when it sees this pattern it knows it is at the start.

SPEED (8 bits)
Required speed. 0 to 99.
DIREC (8 bits)
Required direction in 2 degree steps. 0 degrees is straight ahead,
90 degrees is exact left, 270 exact right, and 180 full reverse. The
value is half of the angle required.

WEAPON (16 bits)
A bitfield to indicate required weapon operation:
0: Front hammer forwards
1: Front hammer reverse
2: Rear hammer forwards
3: Rear hammer reverse
4: Spear forwards
5: Spear reverse
6: Spear multi-throw
7: Reserved (0)
8: Flipper operate forwards
9: Flipper operate reverse
10: Extend flipper forwards
11: Extend flipper backwards
12: Retract flipper
13: Operate flipper
14: Spare
15: Reserved (0)
The reserved positions are there to ensure that the two-byte data can never be the same as the start pattern = 0xA55A.

SPECL (16 bits)
Special requests:
0: Light sequence b0
1: Light sequence b1
2: Light sequence b2
3: Leg assist
4: Emergency
5: Brandish weapons
6: Speed Control Method (0=Open loop, 1=Closed loop)
7: Reserved (0)
8: Lights - reset sequences
9: Lights - Auto repeat
10: Spare
11: Spare
12: Spare
13: Spare
14: Spare
15: Reserved (0)

CRC (16 bits)
16 bit CRC for packet. This is a Cyclic Redundancy Code, and is like a checksum. It is a complicated mathematical function of all the previous bytes in the message. The robot recalculates this from what it received, and if the two are equal, it is highly likely that the message was received correctly. If they are not equal, the whole message is ignored. If there are enough sequential bad messages, the radio link is assumed to be faulty and an emergency power down sequence is initiated.


3.7 Debugging

There are several methods to debug the software. These are a few methods:
  • emulators
  • simulators
  • diagnostics
  • datalogging
  • display indicators
Let’s describe these:
  • Ideally, you would have an emulator which you can plug in the microcontroller socket, and perform single stepping, set breakpoints, display memory and I/O states etc. However, emulators are very expensive.
  • The next best thing for working out where your software is going is a simulator. These run on the PC and allow you to single step, look at memory, and program variables, but becuase they are not connected to the target system, you will have to set the I/O lines as you think they may have been set in the robot. They are good for debugging all your higher level functions in your code which don’t depend on low-level I/O states. Some simulators are better than others for allowing you to set I/O and peripheral devices. Some will even simulate timers that are set up to be clocked internally to the processor, and may have script file interpreting to drive I/O lines.
  • A diagnostic link is great boon. If you are implementing a boot download facility, you can use the same serial port line to implement diagnostics. The basics is to implement memory read and memory write features, which can run in the main sequence loop of the software. This allows you to read variable values (as long as you know their memory address), and setup other values. You can implement "softbutton commands" which perform certain actions if the softbutton code is sent. The softbutton code may be a write to a reserved memory location.
  • On a new design, it is always a good idea to have the ability to perform datalogging of important parameters. A reasonable size store will be required, for example, a 4kbyte serial EEPROM, which only requires 3 control lines. If you are having trouble with a certain part of the code, you can insert LogEvent(EventCode) type function calls which may log various parameters along with a date/time code to the log store. This can be looked at afterwards to try to determine what happened.
  • Display indicators may range from a dot-matrix LCD display (not fitted in real battles!) down to a simple LED that you can flash if your code gets to a certain point. The latter is just about the minimum amount of debug feature you can add, and will strain your debugging skills and patience to the limit!

3.8 Compilers

Most embedded development is done in the C language. Occasionally C++ may be used, or a stripped-down version of C++ called Embedded C++ (EC++). EC++ strips out Exceptions and Templates and various other features of C++ that tend to lead to large memory use and slow operation, but it retains the Classes, Inheritance, Polymorphism, and other important features. A description of C++, or even C, is not appropriate in this document - there are thouands of pages on the web about that! So if you are going to use C, you'll need a C compiler. These are available for nearly all embedded processors. Unfortuantely you will have to pay for most of them though. The table below shows a list of compilers that are available for free. These may be restricted in code size or other ways.
ProcessorCompiler SupplierRestrictions
PICHi-Tech/Computer SolutionsDOS mode only
ManyGNUnone
ManyIARSee here
ManyGNUNone

3.9 An example

As an example of an embedded program, here is the code used in the onboard section of my robot. There is also code in the handset, although that is much simpler since all it has to do is translate switches and joystick analogue values into codes. To make some sense of all the input & output signals, refer to the pinout list.

The code is not debugged yet, but it does compile and build. It is written in C, and compiles under the MCS C Compiler for the Hitachi H8S 2148 microcontroller.


Onboard.c
Onboard.h

This is the top level sequencer.

Lowinit.c

This is the microcontroller initialisation function.

Radio.c
Radio.h

This sets up and performs radio communication, using the Motorola MC13111 FM radio chip.

Commands.c
Commands.h

This accepts the commands from the radio link and decodes them

Motion.c
Motion.h

This detects the wheel speeds, and controls the wheel speeds and direction in either closed loop or open loop mode.

Sensors.c
Sensors.h

This reads the onboard sensors, just a mercury switch at the moment.

Weapons.c
Weapons.h

This controls all the weapons.

Display.c
Display.h

This controls the optional 2-line LCD display. The display controller chip is the ST7066, a compatible chip with the Samsung KS0066, (aka S6A0069).

ShiftReg.c
ShiftReg.h

The H8S does not have enough inputs and outputs, so a shift register chain has been added to extend this. Access to inputs and outputs through this chain is a lot slower, so is only used for non-speed-critical functions. The shift registers used are 74HC165 and 74HC595 (for datasheets see the Philips HC shift registers page).

Lights.c
Lights.h

This controls the LEDs around the periphery of the robot. An Acrobat PDF article about dimming LEDs is available at
http://www.infineon.com/cmc_upload/migrated_files/document_files/Application_Notes/inganled.pdf

Shutdown.c
Shutdown.h

This controls the emergency failsafe power shut down and pneumatic purge.

Binary.h

Definitions so I can use binary numbers in C.

Hardware.h

Hardware specific defintions. This is all placed in one file so if I ever change to a differenct processor, hopefully only this file will need changing.

Ioh82148 .h

This comes with the IAR compiler and is the definitions for all the on-chip peripherals.

cstartup.s37

This is generated by the development tools and is the assembly language functions to initialise all the variables declared in the C code.

Unfortunately I can’t supply the compiler and simulator for download since they are proprietory products!
 

4. Links

There are several links to embedded programming articles at
http://www.compapp.dcu.ie/~cdaly/embed/embedsys.html.
 

4.1. Books

Of all these books, I only own the second one in the list so can only comment on that - it is very good if you want to use a real time operating system and don't want to pay any money! For the others, I have restricted the list to reasonably priced (less than £40), and ones which are more hobbyist/commercial than intellectual. I have attached customer reviews from Amazon.com where possible.

A book,

PIC microcontrollers for beginners,too!
Nebojsa Matic and Dragan Andric
Free online book

Embedded Systems Building Blocks
Jean J. Labrosse
http://www.amazon.co.uk/exec/obidos/ASIN/0879306041/qid%3D984053802/202-6546
ISBN: 094-9120669

MicroC/OS-II RTOS
Jean Labrosse
http://www.amazon.co.uk/exec/obidos/ASIN/0879305436/qid%3D984053604/202-6546
ISBN 094-9120669

Programming Embedded Systems in C and C++
Michael Barr
ISBN: 565923545
http://www.uk.bol.com/cec/cstage?eccookie=&ecaction=bolprditmview&PrdId=502043548

An Embedded Software Primer
David Simon
ISBN: 020161569X
http://www.uk.bol.com/cec/cstage?eccookie=&ecaction=bolprditmview&PrdId=502308814
Synopsis: 'An excellent job of introducing and defining the jargon associated with embedded systems. This makes the text extremely easy to read.' --David Cuka An Embedded Software Primer is a clearly written, insightful manual for engineers interested in writing embedded-system software. The example-driven approach puts you on a fast track to understanding embedded-system programming and applying what you learn to your projects. This book will give you the necessary foundation to work confidently in this field. Building on a basic knowledge of computer programming concepts, this book will help you to: Learn core principles and advanced techniques of embedded-system software. Find out what a real-time operating system (RTOS) does and how to use one effectively. Experiment with sample code and the µC/OS RTOS version 1.11 (on the accompanying CD). Apply what you learn, no matter which microprocessor or RTOS you use. After reading this book, you will be able to tackle the challenges of embedded system programming and quickly reap the benefits of your new skills.

C Programming for Embedded Systems
Kirk Zurell
ISBN: 1929629044
http://www.uk.bol.com/cec/cstage?eccookie=&ecaction=bolprditmview&PrdId=502384462
Synopsis: This text demonstrates all practical steps of C programming on 8-bit microprocessors with programming examples and a complete sample project. The advantages of programming in C are detailed, and the sample project covers preliminary software design to implementation in a working product.

Computers as Components: Principles of Embedded System Design
ISBN: 155860541X
http://www.uk.bol.com/cec/cstage?eccookie=&ecaction=bolprditmview&PrdId=502089352
Synopsis: This title unravels the complexties of computer systems and of the process, tools and techniques necessary for designing them. The author demonstrates concepts using real-world processors as case studies and introduces the basics of UML (Unified Modelling Language).

Embedded Microprocessor System Design : An Introduction Using the 80C188EB
Kenneth Short
ISBN: 0132494671
http://www.uk.bol.com/cec/cstage?eccookie=&ecaction=bolprditmview&PrdId=501293627
Synopsis: The basic structure, operation and design of embedded systems is presented in this work including a balanced treatment of both hardware and software. The Intel 80C188EB microprocessor is used as the instructional example.

Microcontroller Projects with Basic Stamps
Al Williams
ISBN: 0-87930-587-8
http://www.rdbooks.com/scripts/store/vsc/store/products/rd3246.htm?L+/htdocs/rdbooks/config/store+hzir6927
http://www.uk.bol.com/cec/cstage?eccookie=&ecaction=bolprditmview&PrdId=502307514
Synopsis: "Basic Stamp" is the brand name of a chip that is widely used in the prototyping of microcontrollers - the "brains" of electronic devices. This manual teaches the principles and processes of microcontroller development by demonstrating how to program the Basic Stamp. It seeks to serve the needs of those desiring to learn the principles and processes of microcontroller development including beginner, intermediate and advanced embedded systems developers. The opening section explains the basics of microcontrollers for the professional electronic technician and for the hobbyist. The second section provides practical examples and Basic Stamp programming tips for intermediate users - including details about memory allocation and operators. For advanced Stamp users, the last section of the book explains direct PIC assembly language programming. The APP-1 PIC Programmer software, provided on the companion CD-ROM, converts Basic Stamp programs into the more efficient PIC chips assembly language.

Embedded Microprocessor Systems : Real World Design
Stuart ball
ISBN: 075067234X
http://www.uk.bol.com/cec/cstage?eccookie=&ecaction=bolprditmview&PrdId=502386657
Synopsis: An introduction to the design of embedded microprocessor systems, from the initial concepts through to debugging the final result. It is not limited to describing any specific processor family, but covers the operation of and interfaces to several types of processors with an emphasis on cost and design tradeoffs. Included throughout the book are numerous examples, tips and pitfalls you can only learn from an experienced designer. It discusses how to implement faster and better design processes, and how to avoid time-consuming and expensive mistakes. The author's many years of experience in the industry have given him an extremely practical approach to design realities and problems. He describes the entire process of designing circuits and the software that controls them, assessing the system requirements, as well as testing and debugging systems. The less-experienced engineer should be able to apply Ball's advice to everyday projects and challenges immediately with good results. This new edition includes a chapter on advanced concepts and appendices of interest to students and beginners.

Embedded Systems Design
Steve Heath
ISBN: 0750632372
http://www.uk.bol.com/cec/cstage?eccookie=&ecaction=bolprditmview&PrdId=501214179
Synopsis: Microprocessors are becoming increasingly present in many aspects of our daily lives. They have become the standard way of implementing digital systems ranging from sophisticated process control systems to cars, burglar alarms and even children's toys. As a result, the demand for these products is increasing dramatically, as is the need for knowledge and the understanding of technology. This is a guide to all aspects of embedded system design, including the hardware, software and design trade-offs associated with design. However, most hardware these days comes ready packaged as a microcontroller and so the emphasis in the book is on software, since this is where the engineer must develop expertise. The approach taken is largely practical, the aim being to explain how systems are designed in the real world rather than in theory. In keeping with this approach, there is a chapter of case studies included in the book to allow the readers to investigate their own real systems and gain practical experience.

Programming Embedded Microprocessors : A High-level Language Solution
R J Foulger
ISBN: 0850123364
http://www.uk.bol.com/cec/cstage?eccookie=&ecaction=bolprditmview&PrdId=501334583

The Art of Designing Embedded Systems
Jack Ganssle
ISBN: 0750698691
http://www.uk.bol.com/cec/cstage?eccookie=&ecaction=bolprditmview&PrdId=502139493
Synopsis: Aimed at practicing embedded systems engineers, this text is part primer and part reference. It lays out a simple seven-step plan to get firmware development under control and offers ways to linearize the complexity/size curve and ways to get better code and hardware designs.

The Art of Programming Embedded Systems
Jack Ganssle
ISBN: 0122748808
http://www.uk.bol.com/cec/cstage?eccookie=&ecaction=bolprditmview&PrdId=501959558
Synopsis: Embedded systems are products such as microwave ovens, cars, and toys that rely on an internal microprocessor. This book is oriented toward the design engineer or programmer who writes the computer code for such a system. There are a number of problems specific to the embedded systems designer, and this book addresses them and offers practical solutions. It offers cookbook routines, algorithms and design techniques and includes tips for handling debugging management and testing. The philosophy of tightly coupling software and hardware in programming and developing an embedded system is explored.