Testing Status: Untested
This is one of the most commonly requested functions on the Robot Wars Forum. If you hav a robot with two motors driving two wheels, you have three options for controlling the steering:
The last method is the most desirable since it gives ultimate maneouverabilty with the simplest user control method. However, we need some device which translates the two analogue signals steer and speed into two other signals left and right.
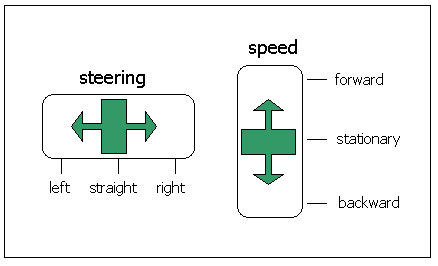
The joysticks that we have are shown in the diagram below. Often they might be incorporated into the same joystick, but there will still be two potentiometers feeding two radio control channels:
The midpoint of the steering joystick represents "drive straight (ahead or backwards)". The leftmost position represents "sharp left turn" achieved by driving the left motor backwards and right motor forwards. The rightmost position represents "sharp right turn" achieved by driving the left motor forwards and right motor backwards.
The midpoint of the speed joystick represents "motor speed off". The lowest position of the speed joystick represents "speed maximum reverse" and the highest "speed maximum forward".
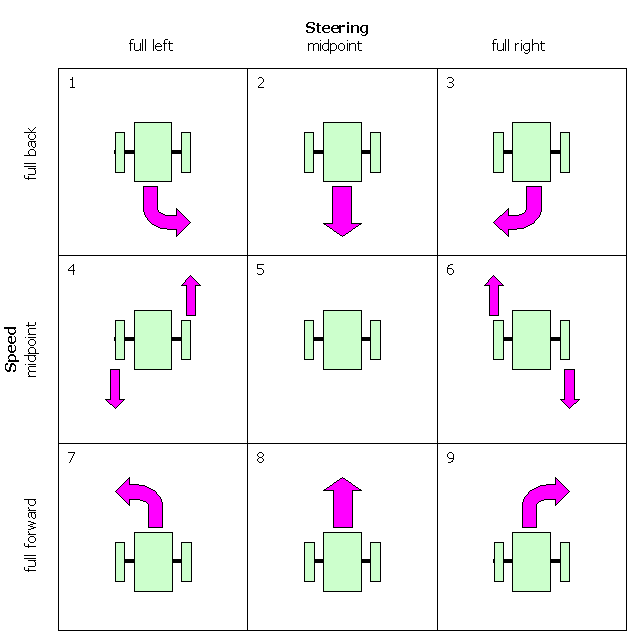
We can draw up a table to work out the conversion process required:
Number |
Joystick position |
Motion |
Motor drive required |
||
Steer |
Speed |
Left |
Right |
||
1 |
Full left |
Full back |
Veer right in reverse* |
stationary |
reverse |
2 |
Midpoint |
Full speed reverse |
reverse |
reverse |
|
3 |
Full Right |
Veer left in reverse |
reverse |
stationary |
|
4 |
Full left |
Midpoint |
Turn left on the spot |
reverse |
forward |
5 |
Midpoint |
Stationary |
stationary |
stationary |
|
6 |
Full Right |
Turn right on the spot |
forward |
reverse |
|
7 |
Full left |
Full forward |
Veer sharp left |
stationary |
forward |
8 |
Midpoint |
Full speed ahead |
forward |
forward |
|
9 |
Full Right |
Veer sharp right |
forward |
stationary |
|
* Veer right in reverse means the robot moves to the right and towards us as seen from behind it. From the robot’s point of view, because it is going backwards it will think of this as a left turn of course! You may prefer the robot to turn in the opposite direction to this. There is no real logical maneouver given these joystick conditions, but you will see that this method results in much simpler circuitry. You will get used to the maneouver after practice.
Diagrams of these maneouvers are shown below:
Maneouver Table
To get an idea of how to generate motor speeds from control inputs, we must first assign a range of values for both steering and speed control as follows. These are arbitrary:
Steering:
Speed:
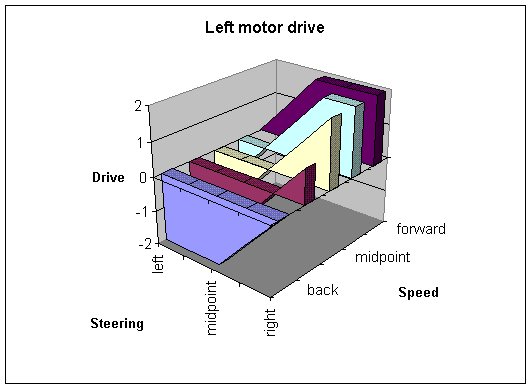
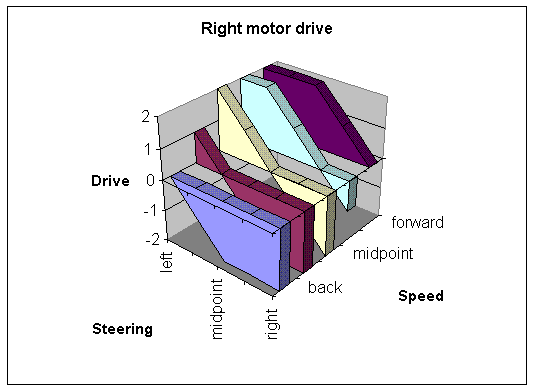
Now we can see what movement is required (from the diagrams in the maneouver table), and we have numeric values to assign to the joystick positions, we can draw graphs of the required motor movement based on the speed and steer inputs, which will give us an idea of the shape of the equations that we require.
Since these equations are functions of two variables, the graphs are 3-dimensional. The graph style used makes it easiest to see the trends in both the X axis and the Y axis. Of course the actual graph is smooth; it doesn't have just 5 speed positions, but is almost continuously variable over both the speed and steering axes.
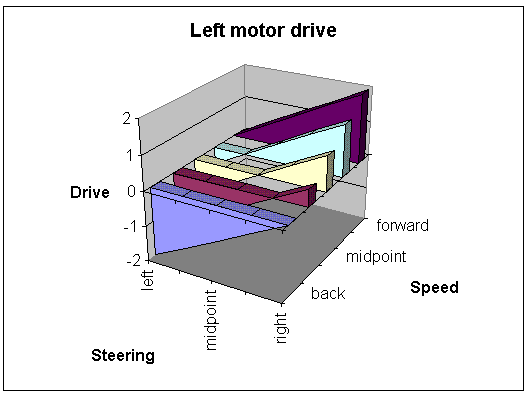
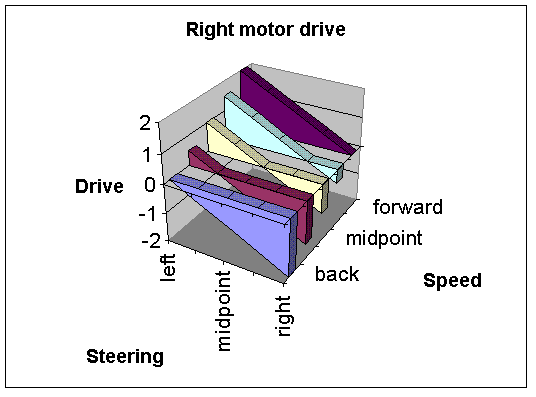
From examination of the trends in these graphs, we can write the equations for the required motor drive level based on the two inputs – Speed and Steering:
![]()
Using the values given above and these equations, the motor drive for each motor can vary between –2 and +2 (as you can see on the graphs). Note that these are just arbitrary numbers. –2 represents 100% PWM reverse, 0 represents 0% PWM, and +2 represents 100% PWM forward motor drive.
So now we can draw a block diagram of the functionality we require of this circuit:
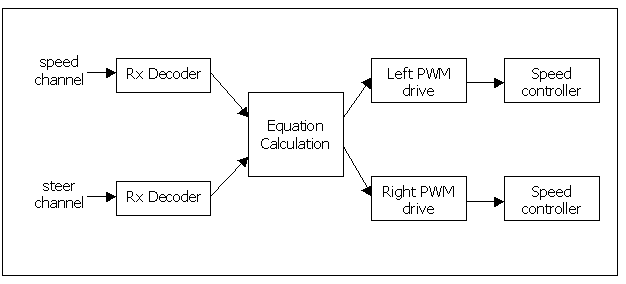
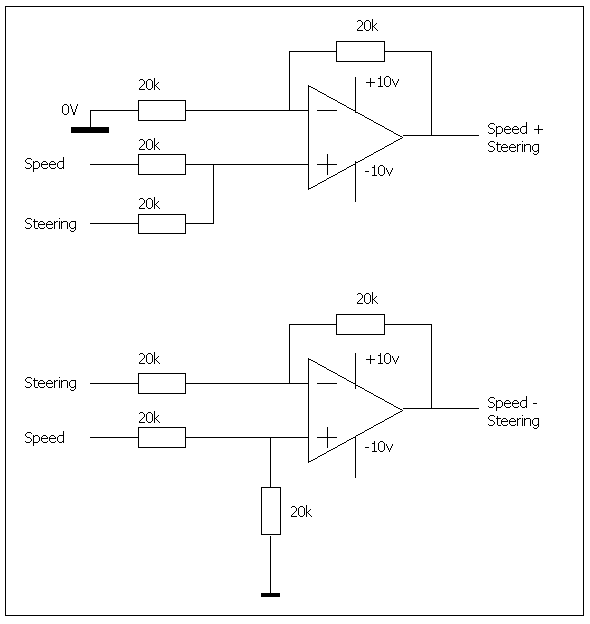
The implementation of the RxDecoder boxes are fully described in their own section here. The equation calculation box uses the adder circuit described in the Adder Circuit page. We can implement this very simply:
The output voltage from the equation calculation box then drives the PWM generators, which are fully described in their own page.
There is a big disadvantage in this scheme. Notice from the 3D graphs that if we want to go full speed ahead, both the left motor and right motor are only operating at half speed. The same situation occurs if we want to go full speed in reverse.
Let’s redraw the graphs with full speed forward and reverse capability, so we can see how the equations need to be altered.
Note that the slope on the back and forward speed position graphs is twice as steep, but saturates at +/- 2. This means that in full forward and full reverse modes, the speed is now maximum.
What are the equations for these graphs?
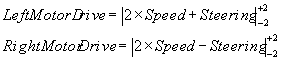
The vertical bars with limits indicate that the drive levels saturate at +/- 2. The easiest way to saturate the output of the circuit is to restrict the supply voltage to the opamp. We must use an opamp type whose outputs can swing to the supplies, will run off a low voltage supply (+/-2V) and we must have fairly accurate opamp power supplies. The following circuit achieves this.
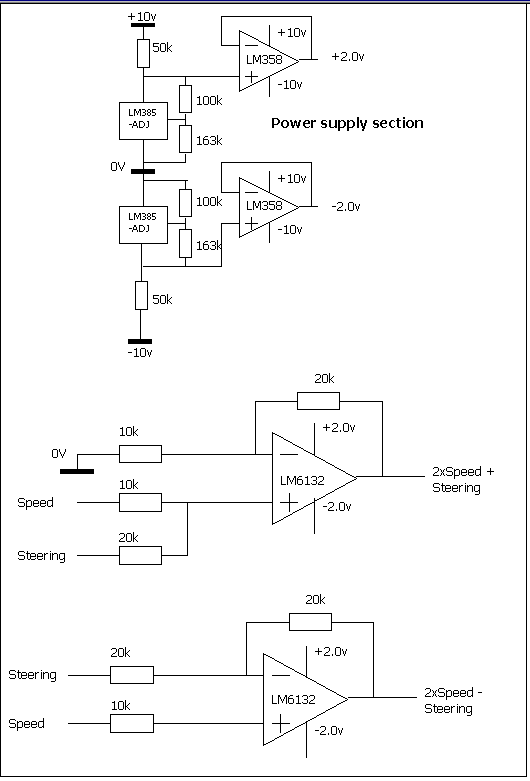
The requirements for the adder circuit opamp in this circuit are quite restrictive. It must:
The opamp chosen is the National Semiconductor LM6132. In fact no opamp can drive its output all the way to the rails, but this one gets typically within 10mV of them so will have an output swing of –1.99v to +1.99v.
Another opamp, which can be any general purpose type is used to buffer the +/-2V power supplies which are generated by precision voltage references,national Semiconductor LM385-ADJ adjustable voltage reference. This can be used to generate a 2.00V reference using 0.1% precision resistors, or a 2.0V reference using much cheaper 1% resistors.
The following devices are used in this circuit. Click on the device name to go to the datasheet. Click on the manufacturer’s name to go to their website.
Manufacturer |
Device & datasheet link |
There is a PIC based project to make a steering mixer at
http://www.eagleairaust.com.au/mixer.htm