V3.02 27-Jul-04
Testing status: Mixed. Some untested, some SPICE simulated.
PWM, or Pulse Width Modulation, is a method of controlling the amount of power to a load without having to dissipate any power in the load driver.
Imagine a 10W light bulb load supplied from a battery. In this case the battery supplies 10W of power, and the light bulb converts this 10W into light and heat. No power is lost anywhere else in the circuit. If we wanted to dim the light bulb, so it only absorbed 5W of power, we could place a resistor in series which absorbed 5W, then the light bulb could absorb the other 5W. This would work, but the power dissipated in the resistor not only makes it get very hot, but is wasted. The battery is still supplying 10W.
An alternative way is to switch the light bulb on and off very quickly so that it is only on for half of the time. Then the average power taken by the light bulb is still only 5W, and the average power supplied by the battery is only supplying 5W also. If we wanted the bulb to take 6W, we could leave the switch on for a little longer than the time it was off, then a little more average power will be delivered to the bulb.
This on-off switching is called PWM. The amount of power delivered to the load is proportional to the percentage of time that the load is switched on.
In the chapter on speed controllers on this site, there is an explanation why PWM signals are used to drive speed controllers. It is the same reason as for the light bulb example above.
These will all be described.
A block diagram of an analogue PWM generator is shown below:
We are starting at the output because this is the easy bit. The diagram below shows how comparing a ramping waveform with a DC level produces the PWM waveform that we require. The higher the DC level is, the wider the PWM pulses are. The DC level is the 'demand signal'.
The DC signal can range between the minimum and maximum voltages of the triangle wave.
When the triangle waveform voltage is greater than the DC level, the output of the op-amp swings high, and when it is lower, the output swings low.
We need to convert the signal coming from the radio control receiver into a PWM demand signal. This can be achieved using a servo, or by using a circuit which decodes the signal from the receiver.
In this method, we want a PWM generator that will take a signal from a servo potentiometer (these signals will need to be taken out by wires from the servo body), and deliver a logic-level PWM output to the speed controller. When the servo potentiometer is at minimum, we want the PWM signal to be 100% off 0% on, and when the servo potentiometer is at maximum, we want the PWM signal to be 0% off 100% on. We also want the on percentage to be proportional to the potentiometer position.
The potentiometer generally has its 'top end' connected to a positive power supply, and its 'bottom end' connected to ground. Then as it rotates the voltage at its wiper changes linearly with wiper position.
This is fully described in the RxDetector page.
There are a few ways of doing this:
An example circuit for this is shown below. This uses a counter and weighted resistor ladder to generate the triangle wave (in fact it will generate a sawtooth, but you'll still get a PWM signal at the end of it). The actual resistor values which are unavailable (40k, 80k) can be made up with 20k resistors, or close approximations can be used, which may distort the sawtooth somewhat, but this shouldn't matter too much.
Click on the circuit diagram to open it in a new window.
The 74HC14 is a Schmitt input inverter, which is connected to act as a simple oscillator. The frequency of oscillation is roughly
but it doesn’t matter a great deal within a few tens of percent.
This square wave generated feeds the 74HC163 binary 4-bit counter. All the
preset and clear inputs of this are disabled, so the outputs, QA
to QD just roll around the binary sequence 0000 to 1111 and
rollover to 0000 again. These outputs, which swing from 0v to +5v are fed into
a binary weighted summer amplifier, the leftmost LM324 op amp section
with the 80k, 40k, 20k and 10k resistors. The output voltage of this
amplifier depends on the counter count value and is shown in the table below as
Amp1 output. The op amp following this just multiplies the voltage by
-½, to make the voltage positive, and bring it back within logic voltage
levels, see the Amp2 output column in the table.
| Counter value | Binary value | Amp1 output (Volts) | Amp2 output (Volts) |
| 0 | 0000 | 0 | 0 |
| 1 | 0001 | -0.625 | 0.3125 |
| 2 | 0010 | -1.25 | 0.625 |
| 3 | 0011 | -1.875 | 0.9375 |
| 4 | 0100 | -2.5 | 1.25 |
| 5 | 0101 | -3.125 | 1.5625 |
| 6 | 0110 | -3.75 | 1.875 |
| 7 | 0111 | -4.375 | 2.1875 |
| 8 | 1000 | -5 | 2.5 |
| 9 | 1001 | -5.625 | 2.8125 |
| 10 | 1010 | -6.25 | 3.125 |
| 11 | 1011 | -6.875 | 3.4375 |
| 12 | 1100 | -7.5 | 3.75 |
| 13 | 1101 | -8.125 | 4.0625 |
| 14 | 1110 | -8.75 | 4.375 |
| 15 | 1111 | -9.375 | 4.6875 |
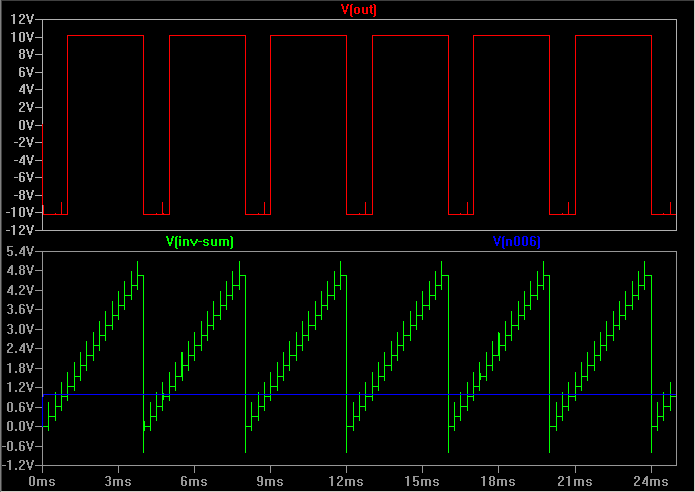
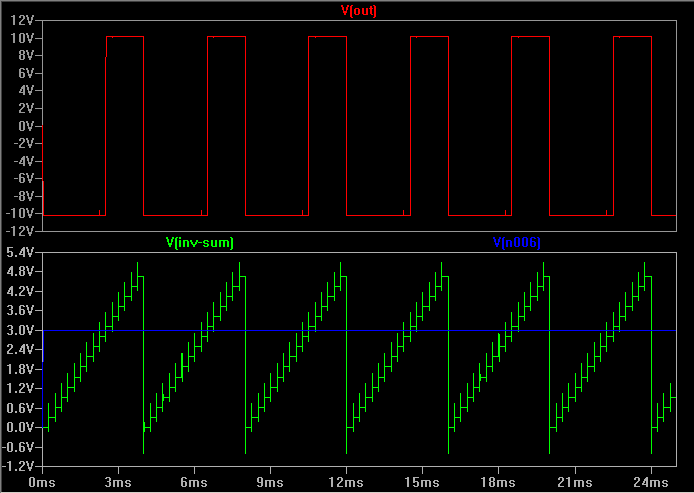
The results of two SPICE simulations are shown below. The first is with the DC threshold level set at +1V, and the second with it set at +3V. The blue line is the threshold level, the green line is at the +ve input of the rightmost comparator, and the red waveform is the output. The difference in PWM ratio can be clearly seen.
ICs specially designed for generating triangle waves are available. Perhaps the most commonly know is the ICL8038, which is quite long in the tooth now but is still perfectly adequate. A circuit for generating a suitable triangle wave is shown below.
Set RA equal to RB for a regular triangle wave (equal rising and falling edges). The frequency of the triangle wave is then given by the equation:

The capacitor value should be chosen at the upper end of its possible range. The waveform generator can be operated either from a single power supply (10V to 30V) or a dual power supply (+/-5V to +/-15V). The triangle wave swings from 1/3 of the supply voltage up to 2/3 of the supply voltage, so on a +12V single supply it would swing from 4V to 8V.
The 8038 is also second sourced by Exar
The register must be loaded with the required PWM level by a microcontroller. This may be replaced by a simple ADC if the level must be controlled by an analogue signal (as it would from a radio control servo).
Below is an example circuit using the digital comparison method when a microcontroller is available to set the 4-bit digital register value. A write strobe is required from the micro to latch the 4 data bits into the register. The 74HC161 counter is free-running, the frequency being set by the 74HC14 oscillator section, where it is roughly f = 1/(6.3RC). The resulting frequency of the PWM signal will be 16 times less than this counter clock frequency, since it requires 16 pulses to complete one "revolution" of the counter. With R=2k and C=1nF this results in a counter frequency of approximately 80kHz which will result in a PWM signal frequency of 5kHz.
The 74HC85 "Greater Than" output will go high when the counter value exceeds the value set in the register. Because this circuit is all 4-bit, there will be 16 discrete levels of mark-space ratio, which is perfectly adequate for our requirements.
Click on the circuit diagram to open it in a new window.
With the threshold value (the value stored in the 74HC373) equal to 8 (i.e. Q7=1 and Q6=Q5=Q4=0), the following (Spice simulation) waveform is generated:
and with the threshold value equal to 1 (i.e. Q7=Q6=Q5=0 and Q4=1), this waveform is generated:
This circuit is basically the same as the previous one, except the demand value that is compared is generated by the National Semiconductor ADC0804 basic 8-bit ADC converter. Since this is an 8-bit ADC, the bottom 4 bits are left unused. The converter is configured to automatically clock itself, with a conversion speed governed by R2 and C2 in the circuit. Here, the conversion rate is fixed at 640kHz which is recommended in the datasheet.
The demand input range is 0 to 2.5V by default, and this may be set by a Receiver Decoder circuit, or by any other means such as a 6V servo potentiometer voltage divided by 2.4.
Although the ADC is self clocking, it does require at least one single pulse on the /WR input to guarantee correct startup. This doesn't have to be a single pulse, it may be recurrent, so the pulse from the radio control receiver which repeats every 20ms are adequate. The complete circuit is shown below.
Click on the circuit diagram to open it in a new window.
In the Receiver Decoder page, a digital circuit was presented which decoded the pulse from the RC receiver into a 4-bit word. That circuit can be merged with the circuit of section 2.2.1 above to arrive at a completely digital solution to PWM generation. The Receiver Decoder circuit replaces U4 of the circuit of section 2.2.1.
Manufacturer |
IC |
Normal use |
Comment |
SMPS |
May operate at up to 100% duty cycle | ||
Signal generation |
PWM output only between 15% and 85%. Generates triangle & sine waves too. | ||
PWM Generator for speed control of portable tools |
Includes integrated current limiting circuitry for output MOSFETs. | ||
SMPS |
Max 90% duty cycle | ||
PWM generator for motor control |
Provides many other features for DC motor speed control. Note there are many other TI motor control devices listed here. |
Alternatively, a MOSFET driver which includes a PWM generator can
be used. I know of only one which is not yet released! The SGS Thomson
TD340.
I will present a design using the SG3525A. Thanks to Clive Sinclair (not that one!) and Mark Case for this circuit:
The frequency of the oscillator, and therefore the PWM signal produced, is governed by the value of the resistor to ground on the RT pin. The sync and osc out pins are not required for our purposes.
The output stage is a little odd, since it is designed for driving bipolar transformers in SMPS circuits. However, we can wire it so it produces a simple single PWM waveform. By not using the bottom transistor of the totem-pole output stages on both OutA and OutB outputs, tying OutA and OutB to ground, attaching a pull-up resistor to the Vc pin, then the bottom transistors of the output stages simply switch the Vc pin to ground, and the signal at the Vc pin is our required PWM signal.
The IC also has two protection mechanisms for use in SMPS circuits which we can also make use of. The soft start feature prevents the output from saturating at 100% ratio when the chip is powering up. This is useful for us as it stops the motors from being driven as our circuits are powering up. The Shutdown input is an active-high input that immediately shuts down the outputs, and resets the soft-start feature. This can be used by current-limiting circuitry to turn off the power MOSFETs in the speed controller, and the soft-start will back-off the PWM while the problem can be addressed by the driver.
If you have a microcontroller on the robot, this may be able to generate the waveform, although if you have more than a couple of motors, this may be too much of a load on the microcontroller’s resources. So if you have chosen to use an onboard microcontroller, then as part of your selection process, include whether it has PWM outputs. If it has this can greatly simplify the process of generating signals. The Hitachi H8S series has up to 16 PWM outputs available, but many other types have two or three.
The following devices were used in this circuit. Click on the manufacturer’s name to go to their web site, or the device name to go to the device datasheet.
Manufacturer |
Device |
| SGS Thompson | SG3525A SMPS controller |
| National Semiconductor | ADC0804 8-bit ADC |
| LM324 Dual op amp | |
ICL8038 Waveform generator |
|
74HC00 Quad NAND gate |
|
74HC14 Schmitt input inverter |
|
74HC85 4-bit comparator |
|
74HC161 4-bit synchronous counter |
|
74HC163 4-bit synchronous counter |
|
74HC373 Octal transparent latch |
|
| Welwyn | 0.1% precision fixed resistor e.g. RS part no 165-769 |