V5.16 10-Jan-06
Many of the robots that compete in the robot wars competition
suffer from control problems. How many have you seen sitting
stranded in the centre of the arena whilst their competitor or
the house robots set about them tearing chunks off! Many of these
stranded robots suffer from communications problems. It is not
enough just to bend a wire coat-hanger in half, bolt it to the
top of your robot, then run any old piece of wire from it to you
radio receiver.
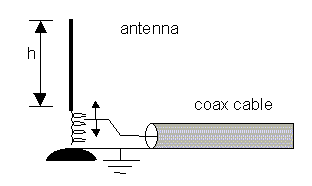
The antenna itself provides a lot of the frequency tuning required to receive the radio signal. The dimensions of the antenna directly control the signal frequencies that it will be tuned to, and consequently picks up, although the tuning frequency can be adjusted by electronic components connected to the antenna as well.
Generally, you will have bought an antenna to match the radio system that you are using. These antennas are mostly quarter-wave dipoles, that is, a piece of thin wire with a length not greater than a quarter of the wavelength of the signal we want to receive. Due to the fact that the radio signal travels slightly slower in a conductor than in air, the length of the antenna must be slightly less than a quarter of a wavelength in air - typically it is about 95% of the air-quarter-wavelength. At 40MHz, this makes the antenna up to 1.875 x 0.95 metres long. This is too long for practical use, and so a shorter one is used, with an inductor fitted near the bottom to compensate for the extra length which is missing. There is a section later in this page which describes how to build your own antenna and what inductor value to use, but it is best to buy one since they are not very expensive.
To match an antenna to the receiver may not be easy without RF test equipment. The receiver will have a ‘characteristic impedance’ which the cable must be matched to. The antenna will also have a characteristic impedance, which must be matched to the other end of the cable (these do not have to be the same but it is easier if they are). 50Ω is a typical value for the receiver characteristic impedance.
To reduce interference induced into the cable from the antenna to the receiver, it is best to use good quality screened coaxial cable. The characteristic impedance of the cable is set by its physical dimensions. Coax is easily available in 50Ω and 75 Ω varieties. Don't scrimp on the cable - you only need a short length so buy the best.
The antenna impedance is a lot harder to find, and is best found experimentally. An ideal quarter wave antenna above a conducting plane has an impedance of 36Ω. In practice, a quarter wave antenna for 40MHz would be 1.78 metres long (1.875 x 0.85). At 459MHz, the length is 15.5cm long and can be used as it is. The antenna may be made shorter than quarter of a wavelength, but will then need a base loading coil to re-tune it (see below).
Perhaps the best thing to do is buy an antenna for the frequency you are using, and stick with it. Mount it as the instructions say. Unfortunately, however, the presence of large amounts of metal in the average robot will reduce the effectiveness of it.
Antennas shorter than the quarter wavelength can be used, but will need to be base loaded as shown in Figure 7a or 7b.
Figure 7a
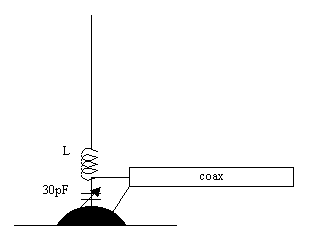
Figure 7b
This involves putting an inductor at the base of the antenna. The value of the inductor to use is given by the equation:
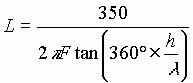
where h is the actual length of the antenna wire, in metres. λ is the wavelength, and F is the frequency (which is 300,000,000 / λ). It is best to make the length of the antenna, and the inductor value about 10% too large, so then you can snip it down gradually afterwards to get the best signal strength at the receiver.
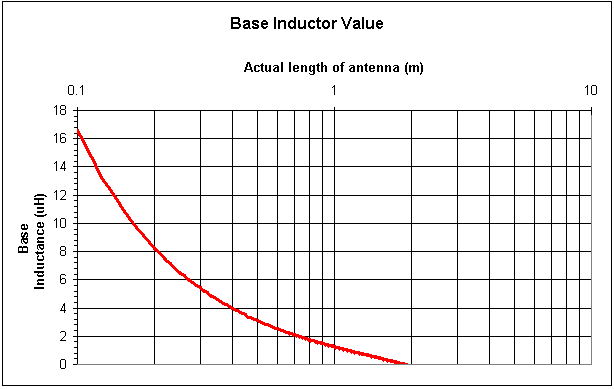
A graph of this equation (starting at length 10cm - any less than this will be pretty useless) is shown below. This is easier to use than the equation to work out the inductance:
This matches the antenna to the frequency of the signal. However, it is not yet matched to the impedance of the cable. To do this, the coaxial cable inner wire is attached to some point along the length of the inductor. The actual position must be found by trial and error, until the best received signal strength is found. It may be at the top, or some fraction of the distance down. Of course the inductor must be a wire wound type with access to each coil so you can connect to it.
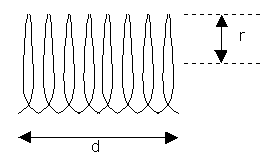
Figure 8
It may be easiest to wind your own. To do this, use the dimensions given in Figure 8, and the following equation to get the number of turns:

where L is the required inductance in microHenries (μH), and r and d are in centimetres. This equation is OK as long as the length is greater than the radius. Note that the turns should be jutted up next to each other, but must not overlap at all.
All the talk above is a bit hairy without a real world example.
Let’s take a desired operating frequency of 40MHz. Then the wavelength, λ, is 300,000,000 ÷ F = 7.5 metres. Let’s say we want the antenna to be 30cm high.
So ...
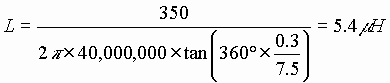
To obtain a 5.4μH inductor, let’s use a radius of 0.5cm, and a length of 2cm (chosen because they are convenient sizes to work with), then the required number of turns is about 36. Enamelled copper wire can be used, wound around a cardboard or plastic former. Using PVC coated wire, it may be difficult to get the required number of turns to fit in the length. To get access to a turn to tap off for the coaxial cable, scratch off the enamel and solder to the wire inside. The enamel can be burnt off with a soldering iron and flux if you want, but the fumes are very toxic so be careful!
Antenna design really is a black art and I will not go into it any more. Books that may help you further in this area are listed at the bottom of this page. If you have any technical questions, a good place to ask them is in rec.radio.amateur.antennaor any other of the rec.radio.amateur newsgroups.
Rather than design your own, which you have seen can be quite hairy, you may like to purchase an off-the-shelf antenna. Some sources are listed in Links section 5.6 at the bottom of this page.
I have produced a separate page with a myriad of weird and wonderful potential antenna designs, some which may work and some which may not!
It then remains to connect the antenna which will probably be on the top of the robot, to the radio receiver module. The impedances of the antenna, the cable, and the receiver should all be matched as closely as possible to one another. The impedance of these items are often stated in their literature. Quarter wave dipoles have an impedance of 36Ω. The receiver module may have the same impedance as this, or it may be 50Ω, which is normally close enough. The cable to connect the two together must also have a 50Ω impedance. Use good quality 50Ω coaxial cable. Coaxial cable will also provide shielding of the radio signal inside the robot from noise sources such as the motors and speed controller. Any connectors used (if you are not soldering the cable on directly) should also have a 50Ω impedance. BNC connectors are the best available at our sort of price range. If you are soldering the cable on, make sure that you strip the absolute minimum of the insulator back, since stripping it like this alters the impedance.
The radio receiver module should be housed in a steel box if possible to shield it from electromagnetic interference (EMI). This box should be electrically connected to the battery negative, and robot shell, with as short a wire as possible. The power connections the receiver should go through the box, and should have feed-through type capacitors from the wires to the box. Ferrite beads threaded on the power wires will also help.
Some robots are designed to work both ways up. In this case, there is no "top" to place the antenna on. If the robot was flipped, then the antenna will be underneath, and control may be lost. Other robots may have the antenna on the side, which may become hidden when the robot turns around. In several cases, it would be an advantage to have two antennas, one on each side of the robot, so that one is always in line-of-sight of the transmitter handset.
The antennas may be simply connected together with a bit of screened coax cable. However, this will upset all the impedance matching that we have performed. If the reception is still OK within the maximum working distance that you want to operate your robot at, all well and good. However, if doing this has upset your required range, then the two antennas must be connected in a manner that maintains the matching.
Here I've presented three methods of performing this matching. Which you choose is up to how adventurous you feel and how much room you've got.
A diagram showing the connection is shown below:
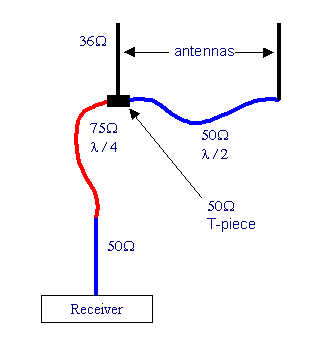
The red line represent 75Ω impedance coaxial cable, and the blue lines 50Ω impedance coaxial cable. The black vertical lines represent the quarter wave dipole antennas. The length of cable between the antennas must be half a wavelength long. This is quite long at 40MHz, but it may be coiled up. To reduce the size of the coil, use a thin coax cable such as RG174/U. The T-piece should be 50Ω . Cheap T-pieces come with ethernet cards for PCs. These days people use the RJ45 connector so the BNC T-piece is generally left over. Although these are not very good quality for 40MHz RF applications, they should be adequate for a radio control application. The curved 75 Ω section must be a quarter wavelength long. This is then connected directly to the 50Ω coaxial cable. The length of this 50Ω piece doesn’t matter, and in fact it can be left out (i.e. the 75Ω coax can be connected directly to the receiver). If the 50Ω coax is used, then it should be joined to the 75Ω coax either by soldering directly (do not strip back any more insulation than is absolutely necessary), or BNC connectors can be used. If you use connectors, make sure that the centre pin of the 75Ω connector fits into the 50Ω connector well, since they are likely to be slightly different sizes.
Suitable components, cables and their lengths are shown in the table below. Note that the length of each cable section is not exactly the wavelength fraction as indicated in the diagram. The actual length also depends on a physical constant of the cable used, called the velocity factor. The actual length is obtained by multiplying the theoretical length by the velocity factor.
| Section | Impedance | Type | Maplin code | Velocity factor | Length (λ) | Length at 40MHz (metres) | Length at 459Mhz (metres) |
| Between antennas | 50Ω | RG174/U | XS62S | 0.66 | 0.5 | 2.475 | 0.216 |
| T-piece to cable junction | 75Ω | RG62A/U | GC32K | 0.86 | 0.25 | 1.613 | 0.141 |
| Junction to receiver | 50Ω | RG174/U | XS62S | 0.66 | doesn’t matter | doesn’t matter | doesn’t matter |
| T-piece | 50Ω | - | CF40T | - | - | - | - |
| BNC plugs | 50Ω | - | NG00A | - | - | - | - |
| BNC plugs | 75Ω | - | DV15R | - | - | - | - |
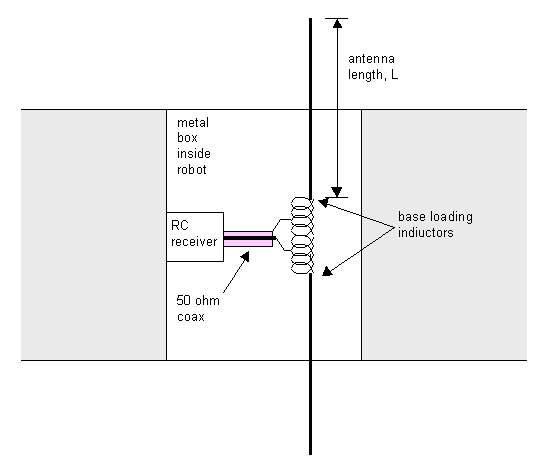
This method uses the base loading coils of the whip antennas mounted inside a shielded metal box to perform the matching. The match will not be as good as the coaxial method described above, but is smaller and may be easier to make. The box should be earthed to the negative of your electronics battery (not the motor power battery). A diagram is shown below:
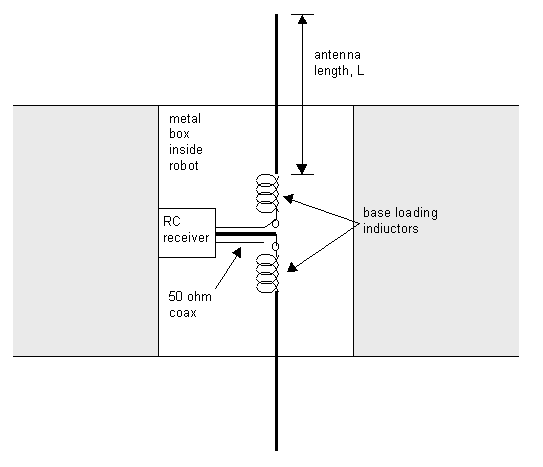
The length of the antennas, L, now includes the section inside the robot and inside the metal box. This is the length used to calculate the value of the base loading coil as described above. A short section of 50Ω coaxial cable is used to connect from the receiver to the bases of the loading coils. Note that the loading coils are not connected together, one goes to the coaxial cable centre conductor and one to the coaxial cable shield. Keep this section as short as possible. Note that the antenna sections inside the metal body of the robot will not pick up much signal, only the sections outside, so try to maximise the length outside of the body.
Some lopping off of the length of the antennas may improve the signal strength received. This is done to compensate for capacitive effects between the antennas and the robot body. Just take off a few millimetres at a time as the signal improves, and stop when it starts to degrade again! If necessary use a sacrificial length of wire the same length and diameter as the original antenna to perform this test to find the optimum length, then cut the final antennas to this length.
Where the antenna goes through a hole in the metal robot body, fit a polythene bush to insulate it. Do not use rubber - this is often carbon-loaded and will affect the antenna. The plastic section inside a coax wire that keeps the central conductor from the shield conductor is ideal for this bush.
This method is similar to that above but can obtain better matching, hence a stronger received signal, hence a greater range of operation. A diagram is shown below:
The two base loading coils are combined into a single coil, with a value twice that calculated for the L of each antenna. This coil should be an air-cored coil wrapped around an insulating former such as an old felt pen body. The equations for the required length, diameter, and number of turns as shown previously. The coaxial cable is soldered onto two points on the coil. The shield to the upper point and the centre conductor to the lower point. This distance from the centre of the coil that these connect to must be found by trial and error until the optimum signal level is obtained. The wire should be tinned copper wire so the coax can be easily soldered to it, or enamelled- copper wire with the enamel scraped off at the points that the coax is soldered to it. If you use tinned copper wire then you must make sure there is a gap between each turn so they don't short together. If you use enamelled copper wire the turns can be jutting up to each other. Scrape off the various points and solder the coax on, and move this point until the optimum position is found. It may be tidier then to make another coil and just scrape off the enamel insulation at the optimum points to ensure no shorting between coils happens.
If you make any of these arrangements, please email me at talulah@ntlworld.com to tell me how effective it was. The more experience I have to pass on the better for everyone.
Since there have been so many questions about this on the Robot Wars forum recently, here's the low-down.
You might think that 35MHz and 40MHz are very similar frequencies, and so all it would probably take to convert a 35MHz set to a 40MHz set is to change the crystal. Unfortunately that's not the case. There are a few reasons why and I'll describe them. One competitor, and experienced electrical engineer, managed to do this operation, but it was not trivial. He looked into performing the operation on demand, but it appears that falls foul of the UK RadioCommunications Agency laws which require manufacturers of radio equipment to have that equipment extensively tested before it can be sold in the UK, which would have been prohibitively expensive.
Let's start at the transmitter electronics. The crystal will have to be changed. However, the transmitter electronics consists of several tuned circuits made up from inductors and capacitors which are all tuned tightly to the required frequency. A 12% change in frequency will cause all these sections to become untuned. Next, the antenna will have to be chopped down in length by 12% so it is tuned to the 40MHz frequency. However, that will also cause it to be mismatched to the driver circuitry, which must be matched in impedance to the antenna. This will require an inductor value change which is rather complicated to work out if you are not going to lose a lot of signal strength.
Once the signal gets to the receiver, the antenna of the receiver will also need modifying in the same manner as the transmitter antenna. The receiver electronics also has tuned circuits which will need component value changes.
In conclusion, yes it is possible, but realistically, unless you have a great deal of knowledge of your radio system, including circuit diagrams, then it is not practicable.
The 40MHz band is split up into many channels which allows two robots to compete against each other both using several channels. As long as the competitors can change their channels so that they do not clash with any other device using that channel, things should be OK.
The actual frequencies of the channels are shown in the table below. Note that the channel numbers are arbitrary, and differ between manufacturers, so the only reliable description of a channel is the actual frequency. The generic channel number in the table is simply the frequency in kHz with 40MHz subtracted, i.e. the three digits of the frequency after the (Mega) decimal point:
Frequency (MHz) |
Channel Number |
||||
Generic |
Futuba |
Hitec |
Sanwa |
JR |
|
40.665 |
665 |
66 |
50 |
50 |
66 |
40.675 |
675 |
67 |
51 |
51 |
67 |
40.685 |
685 |
68 |
52 |
52 |
68 |
40.695 |
695 |
69 |
53 |
53 |
69 |
40.705 |
705 |
70 |
54 |
70 |
|
40.715 |
715 |
71 |
54 |
55 |
71 |
40.725 |
725 |
72 |
55 |
56 |
72 |
40.735 |
735 |
73 |
56 |
57 |
73 |
40.745 |
745 |
74 |
58 |
74 |
|
40.755 |
755 |
75 |
59 |
75 |
|
40.765 |
765 |
76 |
57 |
60 |
76 |
40.775 |
775 |
77 |
58 |
61 |
77 |
40.785 |
785 |
78 |
59 |
62 |
78 |
40.795 |
795 |
79 |
63 |
79 |
|
40.805 |
805 |
80 |
64 |
80 |
|
40.815 |
815 |
81 |
65 |
81 |
|
40.825 |
825 |
82 |
66 |
82 |
|
40.835 |
835 |
83 |
67 |
83 |
|
40.845 |
845 |
84 |
68 |
84 |
|
40.855 |
855 |
85 |
69 |
85 |
|
40.865 |
865 |
86 |
84 |
70 |
86 |
40.875 |
875 |
87 |
85 |
71 |
87 |
40.885 |
885 |
88 |
72 |
88 |
|
40.895 |
895 |
89 |
73 |
89 |
|
40.905 |
905 |
90 |
74 |
90 |
|
40.915 |
915 |
91 |
87 |
75 |
91 |
40.925 |
925 |
92 |
76 |
92 |
|
40.935 |
935 |
93 |
89 |
77 |
93 |
40.945 |
945 |
94 |
78 |
94 |
|
40.955 |
955 |
95 |
79 |
95 |
|
40.965 |
965 |
96 |
90 |
||
40.975 |
975 |
97 |
|||
40.985 |
985 |
98 |
92 |
||
It can be seen that the channels are spaced 10kHz apart. In theory this means that the maximum bandwidth a signal can have is 5kHz. In practice however, it limits it to about 2.5kHz.
To change channels, it is generally necessary to replace the crystals in the radio handset and receiver. A better method is to control the frequency with what is called a frequency synthesiser, which is capable of generating the required frequency by setting switch positions. However, these still seem to be uncommon in RC use.
Note that the crystal frequency is the same as that above for the transmitter, but the receiver crystal frequency will be 455kHz higher than that in the table for a single conversion receiver. In a dual conversion receiver, there will probably be two crystals, the first will be 10.7MHz higher in frequency than that shown in the table, and the second should be 11.155MHz. The reason for this is described in the section on superheterodyne receivers.
Most radio sets transmit a PWM waveform on each channel they have, to control the position of a servo connected to each channel. This is a very inefficient use of the bandwidth, but is easy for the radio set manufacturers to design and build. A more compact, although more complicated, method is to transmit data at around 2400 baud (which will fit in the 2.5kHz usable bandwidth) which can control any number of servos and controls on the robot. However, transmitting data requires a microprocessor at each end of the radio link, details of which can be found in the Embedded Programming chapter.
The other frequency allowed by the Robot Wars competition is 459MHz. Radio handsets are not available that use this frequency. If you want to use this frequency you must buy special radio transmitter and receiver modules. These have frequency synthesisers which allow you to set the channel by adjusting switches. They are designed for transmitting data, and to use them you will need a microprocessor in the handset and robot which will converse using a serial data stream. Again, details of a link such as this (from the software side) can be found in the Embedded Programming chapter.
In theory it would be possible to make your own radio modules to operate on this frequency band. However, in practice, electronics at half a gigahertz is a very tricky business, and without a lot of knowledge, experience, and very expensive test equipment it is highly unlikely you would get anything to work.
However, there are various manufacturers who make modules which operate in these frequency bands. Note that the typical distance values assume a line of sight connection in the open with no local sources of interference. In practice, in a fighting robot arena this will be quite a bit less, although even the 10mW devices should have plenty of range for our purposes.
| Manufacturer/Distributor | Type | Device | Tx power | Typical Range (line of sight) |
Approx Price |
| Circuit Design/ LPRS |
Tx Rx |
CDP-TX-02 CDP-RX-02 |
10mW | 1.7km | £46 £68 |
| Wood &Douglas | Tx Rx Tx |
ST500 SR500 |
100mW | 5.3km | £85 £140 £180 |
| RF Solutions | Tx Rx |
TX6000 |
500mW | 20km | £136 £160 |
| Radiocontact Ltd | Tx Rx |
458/Tx 458/Rx |
10mW | 1km | £273 £336 |
| Radio Tech | Tx Rx |
TAA400/500 Tx TAA400/500 Rx |
100mW | 5km |
Many of these modules can operate on one of several channels. The channels and operating frequencies of the variaous modules are shown in the table below. The Wood & Douglas devices work over a wider frequency range, but not legally in the UK outside the range in the table.
| Frequency (MHz) |
Module channels | |||||
| Circuit Design CDP-02 |
RF Solutions TX6000 |
Wood & Douglas ST500/SR500 |
Radiocontact 458Tx/Rx |
Radio Tech TAA400-500 |
||
| 458.5 | 0 | 1 | ||||
| 458.5125 | 1 | |||||
| 458.525 | 1 | 2 | 2 | 1 | 2 | |
| 458.5375 | 3 | |||||
| 458.55 | 2 | 4 | 4 | 2 | 3 | |
| 458.5625 | 5 | |||||
| 458.575 | 3 | 6 | 6 | 3 | 4 | |
| 458.5875 | 7 | |||||
| 458.6 | 4 | 8 | 8 | 4 | 5 | |
| 458.6125 | 9 | |||||
| 458.625 | 5 | 0A | 10 | 5 | 6 | |
| 458.6375 | 11 | |||||
| 458.65 | 6 | 0C | 12 | 6 | 7 | |
| 458.6625 | 13 | |||||
| 458.675 | 7 | 0E | 14 | 7 | 8 | |
| 458.6875 | 15 | |||||
| 458.7 | 8 | 10 | 16 | 8 | 9 | |
| 458.7125 | 17 | |||||
| 458.725 | 9 | 12 | 18 | 9 | 10 | |
| 458.7375 | 19 | |||||
| 458.75 | 10 | 14 | 20 | 10 | 11 | |
| 458.7625 | 21 | |||||
| 458.775 | 11 | 16 | 22 | 11 | 12 | |
| 458.7875 | 23 | |||||
| 458.8 | 18 | 24 | 13 | |||
| 458.8125 | 25 | |||||
| 458.825 | 1A | 26 | 12,15 | 14 | ||
| 458.8375 | 27 | 13 | ||||
| 458.85 | 1C | 28 | 15 | |||
| 458.8625 | 29 | |||||
| 458.875 | 1E | 30 | 16 | |||
| 458.8875 | 31 | |||||
| 458.9 | 20 | 32 | 14,16 | |||
| 458.9125 | 33 | |||||
| 458.925 | 22 | 34 | ||||
| 458.9375 | 35 | |||||
| 458.95 | 36 | |||||
The position of the antenna affects the quality of the signal it will pick up. The more it is exposed to the radio waves in the air, the more signal it will pick up. However, there are other factors which control the signal strength received.
As described in the section on antennas, they have a tuning frequency and a characteristic impedance. Both these quantities will change if the antenna is brought close to a metal object (except at its base). The antenna has a varying voltage along its length, and so if it is connected at any point to the metal shell of the robot, it will be shorted out and the received signal will be greatly compromised. Even just placing it near the metal shell will affect its parameters and it will not pick up the signal nearly so well.
The signal strength received is dependant on the length of antenna that is subject to the radio waves. Hiding it wholly or partly inside the metal shell, will therefore reduce the received signal strength.
The parameters of the antenna are quite hard to design and get right. You might get away with sticking a wire coat-hanger in your car ariel socket, but it probably won't work for your robot! Connecting the receiver to the metal shell of the robot will not work very well at all. It is best to buy your antenna and stick it on top where it picks up the maximum signal. If you don't have an "on top", then use music wire antennas (that bend very easily and are very tough) on the top and bottom and connect them together as described in section 5.
If you have a rotating shell then you are in trouble! Siting the antenna on the top and connecting it to the receiver through slip-rings is unlikely to be successful since the rubbing slip rings will affect the impedance matching of the line, and introduce a lot of noise. The only practical solution is take the antenna out under the rotating skirt, and then bend it upwards to receive as strong a signal as possible. However, having the shell so close to the antenna is likely to cause problems with shorting, and affect the parameters of the antenna.
The quarter-wave dipole design is optimum when it is positioned vertically above an infinite ground plane with no other objects. To get the best results you must approximate this optimum position. The further away from this position, the worse the performance will be.
Obviously we can't have an infinite ground plane, but the
metallic shell of most robots is quite a good approximation. The
performance will be best if the antenna is in the centre of the
metallic top surface, and will degrade as it is moved towards any
edge.
Note that the signal wire at the bottom of the antenna should NOT
be touching the metallic shell or the antenna will be shorted out
and no signal will be detected.
The antenna should be mounted vertically, which shouldn't be a problem in most cases. If it is, try to make it as near to vertical as possible.
If you are making your own antenna, then as far as possible, maximise the antenna length (and consequently minimise the base-loading inductor). The more length that is subjected to the airwaves, the greater the signal picked up will be.
Avoid any other objects, especially metallic objects, near the antenna. These will affect the characteristics of the antenna and reduce performance.
Unless absolutely necessary, do not hide the antenna inside the robot. This is highly likely to ruin the radio performance.
Unless absolutely necessary, the connection from the antenna to the coax cable, or receiver, should be soldered joints. Try not to use connectors (if you have to use proper RF 50Ω connectors like BNC types). Definitely avoid using sliding contacts like slip-rings or carbon brushes. These are highly likely to ruin the performance.
Rather than repeat information presented elsewhere on the web, I will concentrate on the issues which most roboteers are concerned with, and which are most asked about on the Robot Wars Forum. I have included links to excellent documents relevant to the particular subject.
The 'demand' signal which originates from the joystick position is encoded in two different forms.
Firstly, it must be embedded in a serial stream of data made up of all the channels in the RC system, and transmitted over the ether. The receiver must then take this information, separate out the channels, and encode the demand signal into a Servo Control Signal (SCS).
It is the SCS that many RC modellers are familiar with - the 1.5ms
+/- 0.5ms signal that the servo responds to. This is well
described in the following documents:
[C5] A three part tutorial in PPM radio control
[C5] HVW
Tech. Lots of technical information included.
[E4] Information about the encoding of radio control
radio sets
[E2] Another page like that above
[E5] A basic introduction to radio control servos
[E5] Another Servo tutorial (in two parts)
[E5] More in-depth information on RC servos
The combined signal that is transmitted is slightly different,
and is described in the following document:
[C5] A three part tutorial in PPM radio control
Calling this encoding scheme pulse position modulation is extremely tenuous. PPM implies that the information is carried by the position of the pulse in the pulse stream, though this is not the case. Each channel's pulse in the combined signal varies depending on the previous pulse information, although it is not the position of the pulse, but the width of it which carries the information. Therefore this encoding scheme is actually PWM, although unfortunately the incorrect name PPM has stuck so I will continue to use it since doing otherwise would only create confusion!
The width of the pulse in PPM is determined by the information we want to transmit. For example, the joystick position '0' may have 0.5ms wide pulse, position '5' a 1ms wide pulse, and position '9' a 1.5ms wide pulse. Rather than shaping the width of a pulse to carry this information, why not just send the information directly? This is what PCM does. It is just like the serial data stream on the serial port of your computer. The number is sent with preceding start and appended stop bits, which is picked up by the receiver. This encoding and decoding is performed by UARTs (Universal Asynchronous Receiver/Transmitters) just like in your computer. How the information from the joystick is encoded, that is what number corresponds to what position, is proprietary for each RC manufacturer. One may set the midpoint as value 512 while another uses 255. This is why you can't intermix PCM equipment between manufacturers.
The data encoding protocols are not generally available. However, several people have spent some time trying to discover them. Some information available on encoding protocols can be found on Peter Rother's website. There is also a discussion ongoing about it here which contains lots of useful information and links.. If that link didn't work I have taken a snapshot of the discussion here.
If you are thinking about making your own radio system, or using existing kit and sending data between microcontrollers over it, then you will have to design your own PCM encoding system. Generally 8-bit information is perfectly adequate for a joystick. This gives 256 discrete joystick positions. Any switches you may want need only occupy 1 bit in the data stream also, so 8 switches can occupy a single byte of information. This is more compact than the PPM method of assigning a pulse to each channel of information. It also means that the number of channels is essentially only limited by the time you have to transmit the information for all of them before repeating the data stream, which in turn is limited by the bandwidth of the channel, which we will come onto later.
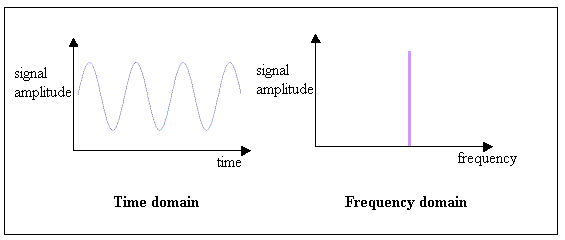
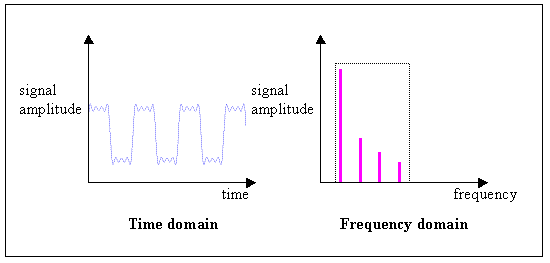
A single frequency signal can be described by the following equation:
![]()
where ‘f’ is the frequency, A is the amplitude, and t is time. The sin() function operates in radians, so every 2 pi radians (one revolution) the signal repeats itself. This is shown in the diagram below in the time domain (the sine wave) and the frequency domain (the vertical line)
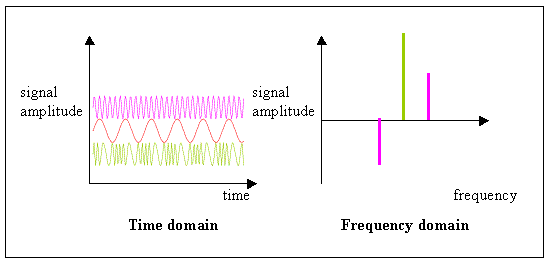
This signal is the carrier wave – a single frequency of 40MHz in our case. Now let’s modulate this carrier sine wave with a signal. The simplest signal to modulate it with is another, low frequency, sine wave. This is done by multiplying the two sine wave signals together:
![]()
Now I have renamed the frequencies fc for the carrier and fs for the signal, and likewise for the amplitudes. using a table of standard trigonometry identities, we can rearrange this equation to get:
![]()
From this you can see that there are now two separate sinusoidal signals, one at a frequency (fc + fs) and one at a frequency (fc -fs). Both have the amplitude A=(Ac×As ÷2). This resultant signal is plotted in the diagram below in both the time and frequency domains:
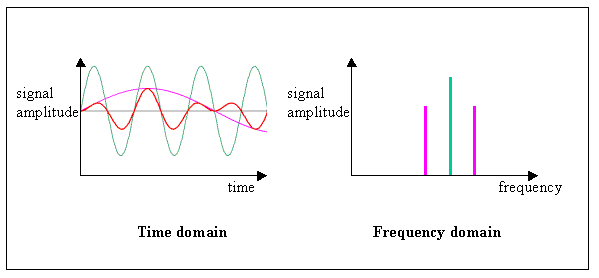
The frequency domain diagram shows that the total width of the resultant modulated signal is 2×fs.
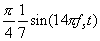
Now we’re not sending a sine wave as the information signal, we’re sending pulses. What difference does that make? It makes a lot of difference, and it makes the signal bandwidth even wider! Let’s take a simple square wave as an example (see diagram below). Without going into the proofs of it which requires some rather complicated Fourier series mathematics, the square wave is given by the equation:

Here, fs is the frequency of the square wave, and is called the fundamental frequency.
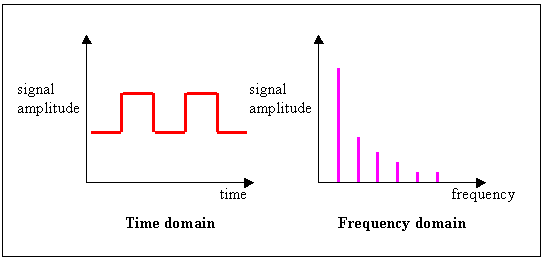
Thus the frequencies present in a perfect square wave extend right up to infinity. We can’t transmit an infinite bandwidth otherwise the Radiocommunications Agency would be very upset with us, so what happens to the square wave if we try to limit its bandwidth? The diagram below shows the time and frequency domains of a band-limited square wave:
This square wave has been limited to a bandwidth 7 times that of the frequency of the square wave (I’ve just used the first four terms of the infinite series equation). Note that the sharp edges of the square wave have been rounded off into ripples. The dotted box in the frequency domain shows the limit of the frequency used.
A data signal is a little more complicated than a square wave – it’s pulses are not necessarily square, and this results in a lot more frequency components being present in between the ones shown. However, it still goes right up to infinity, and limiting its bandwidth like we did the square wave above will damage the nice straight edges of the signal. Therefore there is a trade-off between the frequency of the data sent, and the quality of the data pulses.
The radio channels we deal with in the 40MHz band have an allowed bandwidth of 10kHz. If we were sending just a sine wave as a signal, the maximum frequency of the signal sine wave would be 5kHz before it collides with the adjacent channels. If we are sending a perfect square wave, it is guaranteed to collide with data in adjacent channels, so we must band limit it to 5kHz, and reduce the frequency to a value where we still get a reasonable shaped pulse.
As an example, let’s use the first four sinusoids in the series as we did above, and see what the maximum frequency we can send is whilst staying inside the 10kHz channel. The maximum frequency part of the signal is now:
which has a frequency of 7 times that of the fundamental. This must fit inside 5kHz, so the maximum frequency of the fundamental (or the data rate) is:

Thus you can see that if we are going to send data through the system, as in PCM systems, or pulses as in PPM, the frequency of that data, or width and frequency of those pulses, is tightly restrained.
These modulation schemes are unconnected with whether PPM or
PCM is being used. Rather than defining how the information is
encoded, this specifies how each bit of the information affects
the radio carrier signal. This is described very well in the
following document:
[C5] A three part tutorial in PPM radio control
We have already seen the frequency domain diagrams of AM systems. What does FM look like?
The equation governing a FM with a simple sine wave as the signal is:
![]()
Here, the frequency of the carrier sine wave is altered by the signal sine wave. Again we can expand this equation using trigonometry identities, and we end up with:
v = cos(2πfct) – ½Ascos (2πf c - 2πf m)t - ½As cos (2πf c + 2ρf m)t
This is rather a complicated mathematical step, which is described here if you are interested. Notice that this is very similar to the AM waveform except the difference frequency element has a negative amplitude (can be considered the same sinusoid but 180 degrees phase shifted). It is shown in the diagram below in the time and frequency domains. The time domain shows the carrier, signal, and modulated signals separately for clarity:
We use data or pulses rather than a sine wave to modulate the carrier. In RC systems, the carrier frequency is shifted by 5kHz for a ‘1’, and 0kHz for a ‘0’. However, the resulting frequency domain diagram is still similar.
In terms of which is best, this is covered by this document:
[E4] Everything You NEVER Wanted To Know About
Radios
As we have seen FM has a larger bandwidth than AM for the same signal, and so bandlimitting it to 10kHz results in more of a distortion of the pulses or data. However, FM has some inherent advantages over AM. Primarily it is more immune to noise generated by external devices and fading of the signal through the atmosphere. As the noise gradually increases in an AM system, the detected signal gets gradually noisier. In FM systems as the noise gradually increases, the detected signal gets worse far slower until a threshold is reached where the detected signal is virtually completely destroyed.
Much is made of the advantage of dual conversion
receivers over single conversion receivers, and of comparisons of
range between the two. Both use the superheterodyning technique
described in this document:
[C5] A three part tutorial in PPM radio control
A single conversion receiver has just one local oscillator running at 455kHz above the received signal. This frequency is called the Intermediate Frequency (IF). The result of the demodulation process gives a signal at 455kHz, which can be easily amplified and detected to get the original signal.
A dual conversion receiver has two local oscillators. The first is generally at 10.7MHz above the received signal, which generates a fixed 10.7MHz signal from the demodulator which can be amplified by a circuit tuned to 10.7MHz. The second is then at 10.7MHz + 455kHz = 11.155MHz, and demodulates to 455kHz, which is then amplified and detected as before.
So why use 2 demodulation stages? The reason has to do with how good a filter is required in the IF amplifiers. A dual conversion receiver places much less demands on the IF amplifier if it is to reject any signal outside of the frequency band that we are interested in. This means dual conversion receivers in principle should be better at discriminating between the required signal and an adjacent one. However, whether the manufacturers just use this greater leeway to implement cheaper IF amplifiers with no net gain in selectivity is unknown to us users! In general, dual conversion receivers are more expensive so it can be assumed that they probably are better.
A more complete description of why dual conversion is used can
be found in the document
A three part tutorial in PPM radio control
If you are not going to use a standard RC system, then you have the choice of format of message to send. You may copy the PPM systems common amongst bought systems, or a PCM system may be a far better option.
Designing your own PCM system may be a bit advanced, so one option is to use standard remote control encoding and decoding chipsets. These are used in TV, video and HiFi remote control handsets. Even though they generally use infra-red to transmit the information, this information carrier is irrelevant to the actual information transmitted and to the coding method. Here are some links to remote control IC manufacturer's pages that you may like to review:
Holtek
Toshiba
Texas Instruments
Below is a list of common radio remote control ICs. Many of the large American semiconductor manufacturers have ceased to make their radio control ICs as the new far east semiconductor manufacturers have taken over this market, and RC kit manufacturers increasingly tend to rely on their own ASIC designs. Unfortunately this means datasheets are a lot harder to get hold of - some are not translated into English, and others that have been are still very hard to read!
Note that if you have any intentions of building your own radio system, then it can only be given away as plans - you can't realistically go into small business making them unfortunately. This is because the transmitter would have to go through lengthy and expensive qualification testing by the Radiocommunications Agency in the UK (or FCC in the US) to make sure it complies with legalities.
The list below has links to the new manufacturers and datasheets where available. If you have any more information, more chips, or locations of datasheets please tell me.
Manufacturer |
Part |
Comment |
Source |
| Nat Semi | LM1871 | RC Encoder/transmitter. Discontinued. | Cricklewood Electronics |
| LM1872 | RC Receiver/decoder. Discontinued. | Cricklewood Electronics | |
| Exar | XR2264 | Servo motor controller. Discontinued. Email me for a datasheet. | No source known. |
| XR2265 | Servo motor controller with open collector outputs. Discontinued. Email me for a datasheet. | No source known. | |
| TI | SN28564 | Discontinued. No datasheets available. | No source known. |
| GPS (defunct) |
ZN409 | Servo motor controllers. Discontinued. | Jaycar Electronics |
| Signetics/Philips | NE544 | Servo motor controller. Discontinued. Email me for a datasheet, but also see NJM2611 below and description here. | Telepart |
| NE5044 NE5045 |
7 channel RC controllers. Discontinued. Email me for a datasheet. |
Telepart | |
| NJR | NJM2611 | Servo motor controller. Pin-for-pin compatible NE544. | Pikpower |
| Pericom Technology Inc |
PT8A971P PT8A972P PT8A975P PT8A976P PT8A976AP PT8A976B PT8A977P PT8A978P PT8A970P PT8A973P PT8A974P PT8A990P PT8A991P PT8A992P PT8A993P PT8A995P |
A wide range of remote control ICs. | Distributors page |
| Mitsubishi | M51660L | Servo motor controller. | Telepart |
| Hualon Electronics | HES3017 | Remote car controller receiver. Email me for datasheet. |
Jesstech |
| HES3018 | Remote car controller transmitter. Email me for datasheet. |
Jesstech | |
| The Model Electronics Company | MSC100 | Dual output reversing speed controller. PIC based design takes pulse output straight from RC receiver. | The Model Electronics Company |
| OKI | MSL9362 | Discontinued. 4 channel proportional RC transmitter. | No source known. |
| MSL9363 | Discontinued. 4 channel proportional RC receiver. | No source known. | |
| Toshiba | TA8136S | RC transmitter | Promelec (Russia) |
| Previously made by Realtek. Now manufactured by Highland Electronics in China |
TX2C/RX2C | Remote Controller with five functions | Sales email address |
| RX3C | Remote Controller with two functions | ||
| TX5C/RX5C | Remote Controller with nine functions | ||
| TX6C/RX6C | Remote Controller with seven functions | ||
| Futaba | FP6302B | Futaba's proprietory PCM1024 receiver ASIC. Some scant information here. | No commercial sources. |
| Taiyo | 88-R | Proprietory RC receiver ASIC. No information available. | No source known. |
| Nikko Toys | 2061D | Same as NJM2061D by New Japan Radio, although they don't have any information either. | Still sold by Hobid |
| Name | Author | ISBN | Price | Description |
| The practical aerial handbook | Gordon King | - | £9.50 | Fairly non-technical description of antenna theory and design. |
| Foundations of wireless and electronics | F. W. Scroggie | 0408001887 | £16 | Fairly non-technical introduction to communications and electronics in general. Good basic chapter on antennas. |
| Arrl Handbook for Radio Amateurs 2002 | Dana George Reed | 0872591891 | £29 | Tons of practical information on radio and antennas. |
| Circuit design | Chris Bowick | 0750699469 | £21 | Quite technical introduction to RF circuit design. |
[E5] A comprehensive introduction to using radio control on
fighting robots.
[C4] Loads of helpful articles, mainly about CB,
which are still relevant to us.
http://www.firestik.com/Tech_Docs.htm
[C5] The Model Electronics Company site has some great stuff,
presenting projects as well as commercial products.
http://www.omegaco.demon.co.uk/mechome.htm
[E5] This radio ham has loads of useful information on his
site
http://www.geocities.com/SiliconValley/3569/
[E4] Everything You NEVER Wanted To Know About Radios! Some
technical inaccuracies to do with AM & FM bandwidth, but a
reasonable introduction.
http://www.torreypinesgulls.org/Radio%20Article.htm
[E4] The theory of superheterodyne (dual conversion) radio
receivers
http://www.ezlink.com/~crash/parks/hetbasic.html
[L4] The Panorama Electronics Link Site - Radio section. Loads
of links to technical sites to do with radio communications,
antennas, etc.
http://www.us-epanorama.net/radio.html
[E2] The British Model Flying Association has some information
on radio control.
http://www.bmfa.org/links_commercial.html
[C2] Low Power Radio Solutions sell telemetry modules. The CDP-02
from Circuit Design operates at 459MHz which is an allowable
frequency for Robot Wars in teh UK.
http://www.lprs.co.uk/site01dec99/main.html
http://www.circuitdesign.co.jp/circuitdesign_english/default.htm
[L3] Some links to hobby radio control sites.
http://www.welwyn.demon.co.uk/sites.htm
[E4] A good RC information site
http://rcvehicles.miningco.com/hobbies/rcvehicles/library/glossary/bldef_dualconversion.htm
[E2] The Radiocommunications Agency in the UK govern the
frequency spectrum. This is the band of the spectrum that we are
using.
http://www.radio.gov.uk/document/ra_info/ra365.htm
http://199.104.132.208/ProdCat/tax/0,1252,M942369080308,00.html
[C5] This document from the Model Electronics Company
describes all the model frequency bands
http://www.omegaco.demon.co.uk/mechtml/fmectech.htm#anchor80638
[E1] If you are thinking about designing a 40MHz radio link
yourself, like I was at one point, then Motorola produce this
excellent IC (MC13310) which was designed for CT1 cordless phones
that will operate at the 40MHz channel frequencies. Software for
driving this chip is shown in the Embedded
chapter in "Radio.c".
http://www.mot.com/SPS/WIRELESS/cordless/46_49mhz.html
Motorola ICs
[E1] Unfortunately Motorola no longer supply the above chip.
However, a very similar IC, the UAA2062, is produced by Phillips
http://www.semiconductors.philips.com/pip/uaa2062ts/c1
[E4] A large site containing information on RC electronics
http://www.eagleairaust.com.au/
[C5] HVW Tech. Lots of technical information included.
http://www.hvwtech.com/servos.htm
[E4] Information about the encoding of radio control radio
sets
http://www.geocities.com/BourbonStreet/3220/servotx.html
http://www.aerodesign.de/peter/2000/PCM/PCM_PPM_eng.html
[E2] Another page like that above
http://home.iprimus.com.au/nooyen/multi.htm
[E5] A basic introduction to radio control servos
http://www.seattlerobotics.org/guide/servos.html
[E5] Another Servo tutorial (in two parts)
http://www.uoguelph.ca/~antoon/hobby/servo1.htm
http://www.uoguelph.ca/~antoon/hobby/servo2.htm
[E5] More in-depth information on RC servos
http://www.geocities.com/BourbonStreet/3220/servobasics.html
[E5] Some circuits for generating and receiving PPM RC signals http://www.geocities.com/SiliconValley/3569/use/rc-prop.htm
[E3] Servo pinouts and connectors
http://www.uoguelph.ca/~antoon/hobby/servopin.htm
http://www.uoguelph.ca/~antoon/hobby/leads.htm
[C5] A three part tutorial in PPM radio control
http://www.omegaco.demon.co.uk/mechtml/fmectech.htm#anchor160947
[C4] Information on Futaba's digital servos
http://www.futaba-rc.com/servos/digitalservos.pdf
[C2] Quick UK
http://www.quickuk.co.uk/raccs.htm
[C4] Sussex Model Centre
http://www.sussex-model-centre.co.uk/
[C2] Tower Hobbies
http://www.towerhobbies.com/rcweb.html
[L3] Links to many RC electronics manufacturers
http://rcvehicles.miningco.com/cs/mfgselectronics/index.htm
[C1] Hitec. Manufacturer of RC sets.
http://rcvehicles.miningco.com/gi/dynamic/offsite.htm?site=
http://www.hitecrcd.com
[C2] QuickUK supply 40MHz base loaded antennas:
http://www.quickuk.co.uk/raccs.htm
[C2] Novak. Manufacturer of ESCs and receivers
http://www.teamnovak.com
[C2] Airtronics. Manufacturer of RC sets.
=http://www.airtronics.net
[C2] Futaba. Manufacturer of RC sets.
http://www.futaba%2Drc.com
Note that this section is specifically about interference problems in radio control modelling. All the comments in the EMC and radio sections also applies.
[E4] An article about interference for RC plane flyers.
http://www.uoguelph.ca/~antoon/hobby/rip.htm
[E5] This model club has a page on radio interference and tips
on how to reduce the problem.
http://tenthoffroad.co.uk/interference.html
[C2] Quick UK supply 40MHz antennas which are rather hard to
get hold of. Part no
H5330
http://www.quickuk.co.uk/raccs.htm
[C1] Flair products also sell 40MHz antennas. Part no MX75119.
http://www.flairproducts.co.uk
[C1] Radio tech manufacture antennas for the 459MHz
band. Part nos Hel-458 and 1/4-458
http://www.radio-tech.co.uk/antenna.html